Sunday, June 27, 2010

ALZip : A Freeware for unzipping All Zip files


Unlike other unzipping programs, such as 7zip, which uses a folder with the letter that compares to the file type (Z, for zip, 7 for 7z, R for RAR, etc) and WinRAR (which uses a standard set of books), ALZip uses eggs.


What’s really nice about this program, ALZip is the fact that it handles so much in the ways of files on top of it’s cuteness. ALZip is a file compression program that can unzip 40 different zip file archives. It supports ZIP, 7Z, RAR, EGG, TAR, TBZ, LZH, Z, JAR, ALZ, ACE, ARC, ARJ, B64, BH, BHX, BIN, BZ, BZ2, CAB, EAR, ENC, GZ, HA, HQX, ICE, IMG, LHA, MIM, NRG, PAK, TBZ2, TGZ, UUE, UU, WAR, XXE, ISO, LCD, ZOO, for uncompressed and compresses to ZIP, EGG, ALZ, TAR, TBZ, TGZ, LZH, JAR. Yes, you read it right, it compresses to EGG. That would be the new 8.0 alpha that just got released that supports that format, and it’s basically an ultra compressed ZIP file. It’s interface is also darned easy to understand, to say the least, it’s impossible to get lost in the interface.


Download ALZip

Hey! My friends, If you like my post you can save it using "Save Page as PDF" button below and you can even share them to your friends with social networking buttons provided below this post.

Add To Google BookmarksStumble ThisFav This With TechnoratiAdd To Del.icio.usDigg ThisAdd To RedditTwit ThisAdd To FacebookAdd To Yahoo

Saturday, June 26, 2010

Solution to "Your System Is Low On Virtual Memory" Problem.


I’m going to tell you how to resolve this problem in Windows XP and Windows 7.
 
Most people know how to fix this problem inside of Windows XP, as under Windows XP, it’s well documented on many sites. The steps are quite simple: 
  • Click Start, right-click My Computer, and then click Properties.
  • In the System Properties dialog box, click the Advanced tab.
  • In the Performance pane, click Settings.
  • In the Performance Options dialog box, click the Advanced tab.
  • In the Virtual memory pane, click Change.
  • Change the Initial size value and the Maximum size value to a higher value, click Set, and then click OK.
  • Click OK to close the Performance Options dialog box, and then click OK to close the System Properties dialog box. 

For Windows 7 follow these steps: 
  • Open Computer up and hit the System Properties button, or Right Click on computer and hit Properties, or even still, go to the Control Panel and open the System button
  • Then on the left hand side, there’s a button marked Advanced System Settings
  • On the popup that opens, make sure you’re on the Advanced tab, then hit the button marked Settings under the Performance subsection
  • After that, hit the Advanced tab on that new popup, then hit the Change button for the Virtual Memory sub-section
  • Finally, once here, uncheck the “Automatically Manage Paging” option and increase the size manually. 
Note: If you reduce your page file because you want to regain space, you will run into fatal errors and things acting up. If you are not having any problems with Virtual Memory, DO NOT TOUCH IT.
 
Hey! My friends, If you like my post you can save it using "Save Page as PDF" button below and you can even share them to your friends with social networking buttons provided below this post.

Add To Google BookmarksStumble ThisFav This With TechnoratiAdd To Del.icio.usDigg ThisAdd To RedditTwit ThisAdd To FacebookAdd To Yahoo

Friday, June 25, 2010

Fotobabble : A Website To Create Talking Photos

Fotobabble lets you create talking photos in two clicks. Simply upload a photo and then record your voice directly through your computer to create a talking photo. You can easily share it by e-mail, Facebook, Twitter or embed it into a blog or website.


Fotobabble takes photo sharing to a new level. Fotobabble lets you create talking photos in a matter of two clicks, to enhance photos you want to share with friends and family. Adding a voice…..your voice or perhaps your child’s voice, gives photos life and creates a memorable experience for someone in the process.

Imagine sending a photo while on safari to your friend that is captioned by your voice telling her how you felt the moment you first saw the lion?

Imagine sharing a photo of a 70th birthday party with family on the other side of the world with their voice as an overlay to a shot of their great grandchild sitting on their lap?

Imagine sending a photo to your boyfriend or girlfriend of yourself while adding a romantic or fun message to an image of you standing in front of a sunset?

Imagine adding voice to an event invitation telling your guests about the band you just hired or a book group invite sharing a teaser about the book in two lines?

Simply upload a photo and then record your voice directly through your computer to create a Fotobabble. Then share it by e-mail, Facebook, Twitter or embed it into a blog or website.

It’s free and all completely web-based. No software to download, just register and get started in seconds.

How To Create Talking Picture ?
1. Just signup a free account on fotobabble

2. Insert a title, add a image and click next

3. Now click record and speak into the built in microphone of your computer.

4. Once you have done, click stop and play your voice. If you’re not able to hear your voice, check your volume is turned on and also make sure you have the latest version of Adobe Flash.

5. Add tags and you can also choose your project to be public or private.

6. Save it and it’s ready to share.

7. You can embed in your blog or website, share with your facebook, twitter friends etc.


Hey! My friends, If you like my post you can save it using "Save Page as PDF" button below and you can even share them to your friends with social networking buttons provided below this post.

Add To Google BookmarksStumble ThisFav This With TechnoratiAdd To Del.icio.usDigg ThisAdd To RedditTwit ThisAdd To FacebookAdd To Yahoo

Thursday, June 24, 2010

How To Completely Disable Subtitles In VLC ?

If you watch a lot of videos using VLC, you might have noticed that it enables subtitles by default if they are there, which can be pretty annoying at times. Here’s the quick tip to disable them entirely.

Of course, you can always turn them back on if you want on an individual video basis.

Disable Subtitles
Head into the VLC preferences, and then click the All button at the bottom of the screen.


On the left-hand side, choose Video –> Subtitles/OSD, and then uncheck the boxes for “Autodetect subtitle files”, Enable sub-pictures, and On Screen Display. That should do it, unless the subtitles are forced in the video for some reason.

Note: Certain video formats like MKV can sometimes have subtitles enabled even though there isn’t a separate subtitles file. This is why you need to remove “Enable sub-pictures” as well, which totally disables the on-screen text. You can choose to only uncheck the autodetecting of subtitles instead if you’d prefer.


And of course, you can simply right-click on the video, head to Video –> Subtitles Track and then choose the subtitles if you still wanted them.


Note: this only works if the “enable sub-pictures” option is still enabled.

Hey! My friends, If you like my post you can save it using "Save Page as PDF" button below and you can even share them to your friends with social networking buttons provided below this post.

Add To Google BookmarksStumble ThisFav This With TechnoratiAdd To Del.icio.usDigg ThisAdd To RedditTwit ThisAdd To FacebookAdd To Yahoo

Wednesday, June 23, 2010

What is hiberfil.sys ?

Windows has two power management modes that you can choose from: one is Sleep Mode, which keeps the PC running in a low power state so you can almost instantly get back to what you were working on. The other is Hibernate mode, which completely writes the memory out to the hard drive, and then powers the PC down entirely, so you can even take the battery out, put it back in, start back up, and be right back where you were.


Hibernate mode uses the hiberfil.sys file to store the the current state (memory) of the PC, and since it’s managed by Windows, you can’t delete the file.

Disable Hibernate / Delete hiberfil.sys in Windows 7 or Vista
You’ll need to open an administrator mode command prompt by right-clicking on the command prompt in the start menu, and then choosing Run as Administrator. Once you’re there, type in the following command:

powercfg -h off


You should immediately notice that the Hibernate option is gone from the Shut down menu. You’ll also notice that the file is magically gone!


Disabling Hibernate Mode in Windows XP
It’s a lot easier in Windows XP to get rid of Hibernate mode. Just head into Control Panel –> Power Options, and then find the Hibernate tab. Uncheck the box, reboot your PC, and then you can delete the hiberfil.sys file.


Hey! My friends, If you like my post you can save it using "Save Page as PDF" button below and you can even share them to your friends with social networking buttons provided below this post.

Add To Google BookmarksStumble ThisFav This With TechnoratiAdd To Del.icio.usDigg ThisAdd To RedditTwit ThisAdd To FacebookAdd To Yahoo

Tuesday, June 22, 2010

Rotate A Video 90 Degrees With VLC

Have you ever captured video with your cell phone or camcorder only to discover when you play it back on your computer that the video is rotated 90 degrees? Or maybe you shot it that way on purpose because you preferred portrait style to a landscape view? Before you go straining your neck or flipping your monitor on it’s side to watch your video, here is the method how you can view it correctly in your computer screen.

If you simply want to rotate the video while you watch it, I am showing you how to accomplish that with VLC Media Player.

Rotate and Watch a Video in VLC
At First, Download, install, and run VLC Media Player.


Open your video file by going to Media > Open File… and browsing for your file. Or, by just dragging and dropping your video onto the VLC player.


Choose Tools from the Menu bar and select Effects and Filters.


On the Video Effects tab, tick the Transform checkbox and choose your degrees of rotation. The video is rotated counter-clockwise, so to rotate clockwise 90 degrees you’ll want to choose Rotate by 270 degrees.


Now you can enjoy your video the way it was intended to be viewed.


Hey! My friends, If you like my post you can save it using "Save Page as PDF" button below and you can even share them to your friends with social networking buttons provided below this post.

Add To Google BookmarksStumble ThisFav This With TechnoratiAdd To Del.icio.usDigg ThisAdd To RedditTwit ThisAdd To FacebookAdd To Yahoo

Monday, June 21, 2010

How To Increase Number Of Search Results Shown On First Page Of Google Web Search?

Google Search is great way to find anything anywhere on Internet, all of us has been so addicted to use Google for searching as it provides nice and useful search results. When you search on Google the default number of search results you see is 10 and then in order to see the next 10 search results you will need to scroll down and then click the number 2 or next in Google logo in yellow color to see the next 10 search results.

You can also increase the number of search results being shown on the first page, follow the procedure given below to do it.

1. Open Google.com

2. Click the Search Settings on the extreme right top of the Google page

It will look like as shown below when you are not logged in with your Google account.

It will look like as shown below when you are logged in with your Google account.


Scroll down to locate the section which tells number of search results, change number of search results shown on the first page by selecting a fixed number in the drop down here.

Now click the button Save Preferences button on the extreme right bottom of this page, it will prompt with a confirmation that your new preferences has been saved, now click OK button on the prompt message.

Once you click ok, it will take you to Google search home page automatically.

Hey! My friends, If you like my post you can save it using "Save Page as PDF" button below and you can even share them to your friends with social networking buttons provided below this post.

Add To Google BookmarksStumble ThisFav This With TechnoratiAdd To Del.icio.usDigg ThisAdd To RedditTwit ThisAdd To FacebookAdd To Yahoo

Sunday, June 20, 2010

Core Temp & Real Temp : Freeware Tools To Monitor CPU Temperature


Core Temp is a compact, no fuss, small footprint program to monitor CPU temperature. The uniqueness of it is that it shows the temperature of each individual core in each processor in your system! You can see in real time how the CPU temperature varies when you load your CPU. It's also completely motherboard independent.

Core Temp also has a logging feature, allowing a user to easily record the temperature of his processor(s) over any period of time, then the data can be easily transferred into an excel datasheet for easy graphing. Core Temp works on Windows XP Service Pack 2, 2003 Server, Vista and Windows 7 (both 32bit and 64bit versions).


Real Temp is a temperature monitoring program designed for all Intel single Core, Dual Core and Quad Core processors. Each core on these processors has a digital thermal sensor (DTS) that reports temperature data relative to TjMax which is the safe maximum operating core temperature for the CPU. As your CPU heats up, your Distance to TjMax will decrease. If it reaches zero your processor will start to throttle or slow down so maximizing your distance away from TjMax will help your computer run at full speed and more reliably too.

Download Core Temp

Download Real Temp

Hey! My friends, If you like my post you can save it using "Save Page as PDF" button below and you can even share them to your friends with social networking buttons provided below this post.

Add To Google BookmarksStumble ThisFav This With TechnoratiAdd To Del.icio.usDigg ThisAdd To RedditTwit ThisAdd To FacebookAdd To Yahoo

Saturday, June 19, 2010

ResizeEnable : A Tool To Resize All The Non-resizable Windows

ResizeEnable is a small, free windows hack that gives you the ability to resize any window by dragging and dropping its lower right corner – including those windows that normally do not allow you to resize them.

This tool requires no installation and can be run directly from the exe file. Just run the file and see your mouse convert into an arrow pointer.


Download ResizeEnable

Hey! My friends, If you like my post you can save it using "Save Page as PDF" button below and you can even share them to your friends with social networking buttons provided below this post.

Add To Google BookmarksStumble ThisFav This With TechnoratiAdd To Del.icio.usDigg ThisAdd To RedditTwit ThisAdd To FacebookAdd To Yahoo

Friday, June 18, 2010

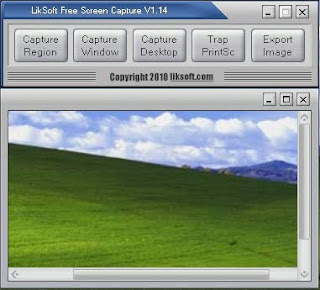
LikSoft Free Screen Capture : A Freeware Tool For Taking Screenshot Images

Liksoft Free Screen Capture is a freeware screenshot taker with professional quality. Along with the full screen view, this tool is capable of taking screenies of active windows, controls, any rectangular area or ellipse region from your desktop.


The tool can be used for your purposes like creating presentations, capturing important data like receipts etc. The captured image can then be saved in many formats like JPG, PNG, or Bitmap file.


Hey! My friends, If you like my post you can save it using "Save Page as PDF" button below and you can even share them to your friends with social networking buttons provided below this post

Add To Google BookmarksStumble ThisFav This With TechnoratiAdd To Del.icio.usDigg ThisAdd To RedditTwit ThisAdd To FacebookAdd To Yahoo

Thursday, June 17, 2010

How To Solve User Name Missing From The Task Manager ?

This is very unusual thing and can happen immediately after the system is booted up that is before the system is fully processed. If the user name field is blank under the Processes tab then try the following solution.

Solution:

1. The problem can occur if the Terminal Services has not started, so to enable it do the following steps.

2. Click Start -> Run and type services.msc

3. Locate Terminal Services and double-click it.

4. Set the Startup type to Manual, and click Apply.

5. Make sure that the service is started and if not then Click the Start button to launch the service manually.

6. Similarly, double-click Fast User Switching Compatibility service.

7. Set the Startup type to Manual, and click Apply.

8. Click the Start button to launch the service manually.

The problem would go and the user names will be listed.

Hey! My friends, If you like my post you can save it using "Save Page as PDF" button below and you can even share them to your friends with social networking buttons provided below this post.

Add To Google BookmarksStumble ThisFav This With TechnoratiAdd To Del.icio.usDigg ThisAdd To RedditTwit ThisAdd To FacebookAdd To Yahoo

Wednesday, June 16, 2010

MakeMKV : A Tool To Convert DVDs & ISO Files To MKV

Looking for a quick and easy way to convert your DVDs or ISOs to MKV files? Today we take a look at the MakeMKV Beta which gets the job done very well.

Installing and Using MakeMKV
Download and install MakeMKV (See download link below) If converting a DVD, place it into your optical drive. When you open MakeMKV you will be greeted by it’s minimalistic interface. Click on the DVD to hard drive button to open the DVD, or the folder icon on the top menu to browse for an ISO file.
MakeMKV will open the disc or file.
Once the disc or file is opened, you’ll see the titles listed in the window on the left. Double-click on the titles to expand the tree structure.
Remove any title or tracks you don’t want to convert by unselecting the check box to the left.
On the right side of the window, click the folder icon to select browse for your file output directory. When ready, click the MakeMkv button to begin the conversion process.
Conversion will proceed.
When the conversion is finished. Click OK.
That’s all there is to it! Your MKV file is ready to play.

Conclusion
MakeMKV is currently still in beta and during the beta phase it will rip both DVD and Blu-ray for free. However, the DVD ripping functionality will always remain free. After 30 days if you want to continue ripping Blu-ray discs, you’ll need to purchase a license. DVD rips are very quick…typically around 15-20 minutes depending on the length of the movie.

MakeMKV is available for Windows, Mac, Linux and will rip and convert DVDs to MKV files. Not all media players natively support MKV playback, so if you’re having trouble playing MKV files, try downloading VLC Media player, or the latest version of the DivX codec.

Download MakeMKV

Hey! My friends, If you like my post you can save it using "Save Page as PDF" button below and you can even share them to your friends with social networking buttons provided below this post.

Add To Google BookmarksStumble ThisFav This With TechnoratiAdd To Del.icio.usDigg ThisAdd To RedditTwit ThisAdd To FacebookAdd To Yahoo

Tuesday, June 15, 2010

10 Things You Don't Know About NOKIA


Here are some facts of the phone company "NOKIA"

1) The ringtone "Nokia tune" is actually based on a 19th century guitar work named "Gran Vals" by Spanish musician Francisco Tárrega. The Nokia Tune was originally named "Grande Valse" on Nokia phones but was changed to "Nokia Tune" around 1998 when it became so well known that people referred to it as the "Nokia Tune."

2) The world's first commercial GSM call was made in 1991 in Helsinki over a Nokia-supplied network, by Prime Minister of Finland Harri Holkeri, using a Nokia phone.

3) Nokia is currently the world's largest digital camera manufacturer, as the sales of its camera-equipped mobile phones have exceeded those of any conventional camera manufacturer.

4) The "Special" tone available to users of Nokia phones when receiving SMS (text messages) is actually Morse code for "SMS". Similarly, the "Ascending" SMS tone is Morse code for "Connecting People," Nokia's slogan. The "Standard" SMS tone is Morse code for "M" (Message).
5) The Nokia corporate font (typeface) is the AgfaMonotype Nokia Sans font, originally designed by Eric Spiekermann. Its mobile phone User's Guides Nokia mostly used the Agfa Rotis Sans font.

6) In Asia, the digit 4 never appears in any Nokia handset model number, because 4 is considered unlucky in many parts of Southeast/East Asia.

7) Nokia was listed as the 20th most admirable company worldwide in Fortune's list of 2006 (1st in network communications, 4th non-US company).

8. Unlike other modern day handsets, Nokia phones do not automatically start the call timer when the call is connected, but start it when the call is initiated. (Except for Series 60 based handsets like the Nokia 6600)

9) Nokia is sometimes called aikon (Nokia backwards) by non-Nokia mobile phone users and by mobile software developers, because "aikon" is used in various SDK software packages, including Nokia's own Symbian S60 SDK.

10) The name of the town of Nokia originated from the river which flowed through the town. The river itself, Nokianvirta, was named after the old Finnish word originally meaning sable, later pine marten. A species of this small, black-furred predatory animal was once found in the region, but it is now extinct.

Hey! My friends, If you like my post you can save it using "Save Page as PDF" button below and you can even share them to your friends with social networking buttons provided below this post.

Add To Google BookmarksStumble ThisFav This With TechnoratiAdd To Del.icio.usDigg ThisAdd To RedditTwit ThisAdd To FacebookAdd To Yahoo

Monday, June 14, 2010

Logos Speaks Themselves


The NBC (National Broadcasting Company) is one of the biggest American television networks. I think most of you have already seen the peacock in this logo. The peacock has 6 different tail feathers, referring to the six divisions at the time that this logo was created. The peacock’s head is flipped to the right to suggest it was looking forward, not back.
The Sun logo is one of the most famous ambigrams in the world. You can read the brand name in every direction; both horizontally and vertically. This logo was designed by professor Vaughan Pratt of the Stanford University.
At first, this logo might not make much sense. But if you look closely, you’ll see the number 1 in the negative space between the F and the red stripes. I also love how this logo communicates a feeling of speed.
Unilever is one of the biggest producers of food, beverages, cleaning agents and personal care products. They produce a huge amount of different products and they wanted to reflect this in their logo. Each part of the logo has a meaning. For example: the heart represents love, care and health - feeling good, a bird is a symbol of freedom. Relief from daily chores – getting more out of life.
Carrefour is one of the biggest European retailers, and it’s also French for “crossroads”. The logo symbolizes this word via two opposite arrows. They also added the first letter of the name, because if you look closely you’ll see the letter C in the negative space between the two arrows.
Sony Vaio is a well known brand of laptops. But did you know that the name Vaio logo also had a hidden meaning? Well, the first two letters represent the basic analogue signal. The last two letters look like a 1 and 0, representing the digital signal.
The old logo of Baskin Robbins had the number 31 with an arc above it. The new logo took this idea to the next level. The pink parts of the BR still form the number 31, a reference to the 31 flavours.
Toblerone is a chocolate-company from Bern, Switzerland. Bern is sometimes called ‘The City Of Bears’. They have incorporated this idea in the Toblerone logo, because if you look closely, you’ll see the silhouette of a bear.
Continental is a manufacturer of tyres. You could actually see this in their logo, because the first two letters create a 3-dimensional tyre.
This is probably one of the best known logos with a hidden meaning. If you look closely, you’ll see an arrow that’s formed by the letters E and x. This arrow symbolizes speed and precision, two major selling points of this company.
This logo doesn’t seem to hide much at first sight, but it gives you a little insight in the philosophy behind the brand. First of all, the yellow swoosh looks like a smile: Amazon.com want to have the best customer satisfaction. The swoosh also connects the letters a and z, meaning that this store has everything from a to z.

Hey! My friends, If you like my post you can save it using "Save Page as PDF" button below and you can even share them to your friends with social networking buttons provided below this post.

Add To Google BookmarksStumble ThisFav This With TechnoratiAdd To Del.icio.usDigg ThisAdd To RedditTwit ThisAdd To FacebookAdd To Yahoo