Tuesday, August 31, 2010

प्रमोद काका : सम्झनामा .... अब स्मृतिमा मात्र रहयो तपाइको साथ !

आज सधै जस्तो Technical Stuff पोस्ट गर्न मन लागेन ... मेरो मनले मानेन र मूडनै जागेन |लागोस पनि कसरी ? बाल्यकाल देखि देखेको अनि काखमा हुर्केको प्रमोद काका बितेको खबर सुने ... पत्याउनै गार्हो पर्यो | बिल्कुल हट्टा कट्टा मान्छे कसरी एकै पटक स्वर्गे हुनुभयो ? अह अझै पनि विश्वास लागेन|

बिहान बिहानै साबु aunty ले धोका ढकढक पार्नु भयो र त्यो नराम्रो खबर सुनाउनु भयो | खाटबाट जर्याक-जुरुक उठे | घडी हेरे ४ बजेको रैछ | एकै छिन् अघि सम्म छोरी खेलाएर सुताएको थिए (१:३० मा उठेकी ३:३० सम्म खेल्दै बसेकी उसलाई के मतलब दिन र रात सँघ )|आँखा भर्खर लागेको मात्रै थियो |त्यो खबर सुन्न साथ निन्द्रा ले छाड्यो | बुबा पनि १३ गते आउनु भएको थियो काठमाडौँ अफिसको कामले, पल्लो कोठामा हुनुहुन्थ्यो.. अघि नै खबर थाहा पाउनु भएछ | आँखा रसाएका, अनि चिन्तित मुहारले थाहा भै हाल्यो बुबाको पिर, निकै ठुलो चोट परेछ न परोस पनि कसरी संगै खेलेका बढेका आफ्नो मित्र यसरी अकस्मात् बितेको खबर सुन्दा | १ हप्ताको लागि आउनु भएको बुबा अब घर जाने हुनु भयो आफ्नो साथीको अन्तिम दर्शन गर्न |

मेरो बुबाको सानैदेखिको साथी, हाम्रो घर संगसंगै टासिएको घर अनि असल छिमेकी पनि | मलाई खुब माया गर्नु हुन्थ्यो uncle ले | दशैको बेलामा बुबाहरु साथीभाइ सबै जना एकै ठाउँमा भेला हुन्थे अनि जम्थ्यो ताश र सेकुवा को महफिल | अखडा चाही हाम्रो पुरानो घर (फोटो तल छ ) हुन्थ्यो | हरि uncle, सुशील काका, कुमार uncle सबजना आउनु हुन्थ्यो | तेसबेला हामी दाजु भाई साना साना थिऔ, अनि uncle हरु जसले जित्यो १ रुपैया हाम्रो लागि जितौरी हुन्थ्यो |हाम्रो नया घर बने पछि हाम्रोमा तास भिड्नु हुन्थ्यो, पछि प्रमोद काकाले घर बनाए पछि उहाहरुको मै जम्ने गर्थ्यो | अब त यसपालीको दशैंनै सुन्य हुनेभो |

२-४ दिन देखि प्रमोद काकालाइ Breathing Problem थियो रे |त्यसैको उपचार गर्न भनेर घोपा जानु भएको थियो , गएकोगै हुनु भयो | आज काठमाडौँ लाउने तरखरमा uncleको परिवार थियो रे |रोग के थियो,रिपोर्ट के आयो यो article लेख्दा सम्म थाहा छैन | आखिर भएको के रैछ त ? आज राती नि मज्जाले कुरा गर्नु भाको थियो रे अलिक अप्ठेरो छ सास फेर्न भन्नु भाको थियो रे | तर बिधिको बिधान .... कसैले पनि १% सोचेको नि थिएन यस्तो हुन्छ भनेर |

बट्टब्रिक्षको हागाबाट फेरी एउटा पात झर्यो
हिड्दै थियो जिन्दगानी फेरी एउटा साझ पर्यो ।।

प्राण पखेरु एउटा चरो
रुख छाडी अन्त्यै सर्यो
हिजो लूट्पुटिएको काख
आज मर्यो भन्नै पर्‍यो।।

हार्दिक समबेदना!
२०६७ साल भाद्र १५ गते ५० बर्षको उमेरमा श्री प्रमोद तामांगको अल्पायुमै असामयीक देहबसान भएकोमा शोक सन्तप्त परिवार तथा आफन्तजनमा हार्दिक समबेदना प्रकट गर्दछु । स्वर्गिय आत्माको चिर शान्तिको कामना गर्दै परिवारजनमा धर्यधारण गर्ने शक्तिको निमित श्री पशुपतिनाथसँग आरधना गर्दछु ।

विजय मिश्र
एवम्
समस्त मिश्र परिवार

Uncle को स्मृतिमा : 


Add To Google BookmarksStumble ThisFav This With TechnoratiAdd To Del.icio.usDigg ThisAdd To RedditTwit ThisAdd To FacebookAdd To Yahoo

Monday, August 30, 2010

Smart Virus Remover : A Solution To Pen Drive Icon Looking Like A Folder

Few days back one of my friend came across a trouble with his pen drive. When he connected the pen drive into the computer's USB port, the icon of the drive looked like a folder rather than a drive. Obviously it was a virus problem. I scanned it with Avira. But it could not find any infection though it was up to date. Then I tried this tool called "Smart Virus Remover". It scanned the drive and deleted the autorun.inf file. Then the icon was changed.


So if ever you face such problem then you may try the above. Download and Install it & click on delete autorun.inf files. Your drive will be scanned and Smart Virus Remover will delete the aurorun.inf file from it. Once you have done. Just unplug the usb drive and reconnect it. Sometimes you may need to restart the computer. You will see your icon restored.


Alternative Approach:
Start –> Run –> cmd -> ok

Type below:
attrib -a -h -r -s PenDriveNameautorun.inf
del PenDriveNameautorun.inf

eg.
attrib -a -h -r -s h:autorun.inf
del h:autorun.inf

Hope it should solve the problem.

Hey! My friends, If you like my post you can save it using "Save Page as PDF" button below and you can even share them to your friends with social networking buttons provided below this post.

Add To Google BookmarksStumble ThisFav This With TechnoratiAdd To Del.icio.usDigg ThisAdd To RedditTwit ThisAdd To FacebookAdd To Yahoo

Sunday, August 29, 2010

How To Identify Unknown Devices In Device Manager ?

We see that while installing Windows operating system on a new computer, there are devices which are not installed automatically and these devices show up as unknown devices in Device Manager in Windows and display a yellow exclamation mark.These devices need device drivers to work properly and we need to install them.

There are free tools which will directly suggest drivers for these devices, these tools includes: 3D Chip, Driver Easy, etc but in many cases these tools don’t work because they don’t cover all devices. To identify such unknown devices, follow these simple steps :

1. Press “Windows Ker + R” or Start > Run to launch Run Prompt. At the Run Prompt, type “devmgmt.msc” and press enter to launch Device Manager.

2. On Device Manager Screen, Locate the unknown device with yellow Exclamation mark, right click on it and click Properties.

3. On Device Properties Window, click on Details tab and select Hardware Ids from the drop down menu option.

4. On the Hardware Ids screen, note down the VEN and DEV ids of this unknown device. VEN is the vendor id and DEV is the device id. Combination of these two can identify a device very accurately.

5. Open the website "www.pcidatabase.com", this website contains an exhaustive database of PCI device manufacturers and devices. At this website, enter the VEN code and search the vendor name.

6. The search results will show you the vendor name. Now click the vendor name link to see the devices by the vendor and locate your device there.

7. Click the device name, it takes you to the devices page for this vendor. Once you know which device is it, you can got to the manufacturer’s website and download the required device drivers and install them manually.

This type of device search is very useful when the plug and play drivers are not present and you are not sure which device is there on the unknown list.

Hey! My friends, If you like my post you can save it using "Save Page as PDF" button below and you can even share them to your friends with social networking buttons provided below this post.

Add To Google BookmarksStumble ThisFav This With TechnoratiAdd To Del.icio.usDigg ThisAdd To RedditTwit ThisAdd To FacebookAdd To Yahoo

Saturday, August 28, 2010

RoundMyPic.com : A Website that lets you add rounded corners to the pictures with bevel effect

 I know many of you like to make your images better by adding rounded corners to them. This can be done with any photo editing software like Photoshop and GIMP but why go through the time-consuming heavyweight software when you can do it online within seconds?

RoundMyPic.com is a simple online tool that lets you add rounded corners and bevel effects to your pics. Simply upload an image from your computer and click ‘Round it now‘. You can also give your image a new width and height and choose not to have a bevel effect. You can also specify a round size for your image. The resulting image can be easily downloaded to your computer.

 First, go to RoundMyPic.com. On the right of the screen, click the button that says Browse to upload the image. Select the file you need to make it round edge and click Open. Click the button that says Round it Now. Your photo will then upload. This may take a minute or so, depending on the size of your picture and your internet connection speed. After your picture uploads, scroll to the bottom of the screen and click the yellow Download button. Choose the location on your computer where you want to save your file and click Save. You now have a picture with rounded edges, ready to use in a PowerPoint presentation, on a blog, or anywhere else you want.


Resizing a picture before giving it rounded edges is just as easy with RoundMyPic.com. On the first screen where you upload your picture, click the link that says More Options. Several options are now available. You can choose a new height and width for your image, how large the rounded edges should be or you can turn off the bevel effect all together. The options are in pixels, so choosing a new image size may take a bit of guessing to choose the right size for your image, especially without a lock aspect ration option. Once you have made your selections, just click Round It Now to see your results as shown below:

Note: Regardless of original picture format, Round My Pic’s results appear as a PNG.

Visit RoundMyPic.com HERE

Hey! My friends, If you like my post you can save it using "Save Page as PDF" button below and you can even share them to your friends with social networking buttons provided below this post.

Add To Google BookmarksStumble ThisFav This With TechnoratiAdd To Del.icio.usDigg ThisAdd To RedditTwit ThisAdd To FacebookAdd To Yahoo

Friday, August 27, 2010

HTML to PDF Converter Free : A Tool that Converts HTML To PDF

HTML to PDF Converter Free is a powerful and easy-to-use freeware that is designed to convert HTML file or URL to PDF document. Just specify the file name or a URL, HTML to PDF Converter will directly convert it to a PDF document. HTML to PDF Converter is standalone software, Adobe Acrobat Reader is NOT required. HTML to PDF Converter doesn't depend on any print driver so it will NOT install any print driver on your computer. 


You can convert to PDF any Web page from a specified or HTML/MHT file from the disk completely for free. The resulted PDF has no stamps on it or other limitations.. Just put the HTML file or any URL in the converter and you will get PDF file. It gives the option for you to enable java,javascript or activeX.

You can even set title, Keywords, Author, Subject, Producer of the PDF document. This little program is useful if you want to save a webpage into PDF. The most attractive feature of the program is that it is available free of cost.

Main Features:
  • Easy to use.
  • Converts HTML file or URL.
  • Enable or disable JavaScript, Java or ActiveX.
  • Set the document title, subject, author, keywords, produce information.
  • Does NOT need Adobe Acrobat software.
  • Doesn't depend on any print driver.
System requirements:
Windows 95/98/ME/NT/2000/XP/2003/Vista/Windows7.

Download the Software from HERE

Hey! My friends, If you like my post you can save it using "Save Page as PDF" button below and you can even share them to your friends with social networking buttons provided below this post.

Add To Google BookmarksStumble ThisFav This With TechnoratiAdd To Del.icio.usDigg ThisAdd To RedditTwit ThisAdd To FacebookAdd To Yahoo

Thursday, August 26, 2010

PDFArea Image to PDF Converter Free : A Free Image To PDF Converter Tool

PDFArea Image to PDF Converter Free can convert your all your images into a single PDF file. The program is really useful if you want to make a single copy of pdf from scanned documents. Just add image files (supports JPG, BMP, PNG, TIF, TGA, GIF formats) to the list and click the Convert button, this program will make a PDF document in seconds. You can set page size and PDF information, such as title, subject, author, etc.


The program is a simple 2 MB download and neither install any printer driver nor any pdf reader is needed. PDF to Image Converter is able to convert:

JPG to PDF
TIF to PDF
GIF to PDF
PNG to PDF
TGA to PDF
BMP to PDF

System requirements:
Windows 95/98/ME/NT/2000/XP/2003/Vista/Windows7

Download The Software from HERE

Hey! My friends, If you like my post you can save it using "Save Page as PDF" button below and you can even share them to your friends with social networking buttons provided below this post.

Add To Google BookmarksStumble ThisFav This With TechnoratiAdd To Del.icio.usDigg ThisAdd To RedditTwit ThisAdd To FacebookAdd To Yahoo

Wednesday, August 25, 2010

How To Fix Blue Screen of Death in Windows 7 ?

Computer errors have become an irritation for so many people now. One of the most common asked questions is how to fix windows 7 blue screen of death (BSOD).


The problem happens when the computer screen becomes blue. All the working computer programs are stopped in between. This error is such a huge problem for people because all the programs stop working. On top of it, any unsaved work is lost forever. Therefore, the users have to do their best to get rid of such blue screen errors.

Compared to Windows XP & Vista, BSOD aka blue screen of death annoyance is very less with Windows 7 but that does not mean Windows 7 is full proof to BSOD error. Recently Microsoft has noted Windows 7 may crash with blue screen of death error for no apparent reason followed by error message “STOP: 0×0000000A.”


Computer running Windows 7 occasionally crashes after it runs for some time. You receive a Stop error message with blue screen. The Stop error message resembles the following: STOP: 0×0000000A (parameter1, parameter2, parameter3, parameter4) IRQL_NOT_LESS_OR_EQUA

The biggest flaw in Windows 7 in my opinion was the frequency of Blue Screen Of Death when a USB device was unplugged without ejecting it from Windows. It was like if someone using Windows XP would come to the person using Windows 7 and plugged in his USB drive and then he would hurriedly unplug his USB drive without knowing that it would crash the Windows 7.

The error codes on Blue Screen of Death are usually 0x0000007E and 0×00000050. Fortunately the hotfix for fixing this issue is available with Microsoft now. To see the details about this error message go to this Microsoft article KB979538.

Download the hotfix from the following location:

Hotfix for KB979538

Download Fix302249 for Windows 7/Windows Server 2008 R2.

Hey! My friends, If you like my post you can save it using "Save Page as PDF" button below and you can even share them to your friends with social networking buttons provided below this post.

Add To Google BookmarksStumble ThisFav This With TechnoratiAdd To Del.icio.usDigg ThisAdd To RedditTwit ThisAdd To FacebookAdd To Yahoo

Monday, August 23, 2010

NirCmd : A Freeware Windows Command-line Tool

Introduction:
NirCmd is a small command-line utility that allows you to do some useful tasks without displaying any user interface. By running NirCmd with simple command-line option, you can write and delete values and keys in the Registry, write values into INI file, dial to your internet account or connect to a VPN network, restart windows or shut down the computer, create shortcut to a file, change the created/modified date of a file, change your display settings, turn off your monitor, open the door of your CD-ROM drive, and more.

System Requirements
This utility can work in all 32-bit Windows operating systems: Windows 9x/ME, Windows NT, Windows 2000, Windows XP, Windows Server 2003, and Windows Vista. However, some of NirCmd commands works only on Windows NT/2000/XP/2003/Vista.

License
This utility is released as freeware. You are allowed to freely distribute this utility via floppy disk, CD-ROM, Internet, or in any other way, as long as you don't charge anything for this. If you distribute this utility, you must include all files in the distribution package, without any modification !

How To Install?
The installation of NirCMD is pretty simple. Just download the zip file from the location given below and extract to a folder. Run NirCMD.exe and select Copy to Windows Directory. By selecting this option, you don’t have to give full path of nirCMD in the command line.

How To Use?
Let’s take a look at the usage of this small utility. Once it’s copied to Windows directory, go to cmd and issue the following command:

C:>nircmd cdrom open d:
where d: is the CD-ROM drive letter.This will open the CD-ROM tray.

Examples of what you can do with NirCmd:

Close the door of F: CD-ROM drive
nircmd.exe cdrom close f:

Remove the title bar of My Computer window.
nircmd.exe win -style title "my computer" 0x00C00000

Hide the clock on the system tray
nircmd.exe win child class "Shell_TrayWnd" hide class "TrayClockWClass"

Empty the recycle bin in all drives.
nircmd.exe emptybin

Hide the desktop window
nircmd.exe win hide class progman

Set the volume to the highest value
nircmd.exe setsysvolume 65535

For more examples see HERE

Download NirCmd

Hey! My friends, If you like my post you can save it using "Save Page as PDF" button below and you can even share them to your friends with social networking buttons provided below this post.

Add To Google BookmarksStumble ThisFav This With TechnoratiAdd To Del.icio.usDigg ThisAdd To RedditTwit ThisAdd To FacebookAdd To Yahoo

Saturday, August 21, 2010

Fix It Center : A Microsoft's Tool That Fix Common Problems to Windows.

Microsoft has provided a solution to fix common windows problems through a managed interface. Microsoft Fix It Center will scan your system for any kind of problem and then list solution to it. Fix it Center consolidates the diagnosing and repairing a problem into an automated tool.

Fix it Center downloads the latest troubleshooters in the Microsoft library to your PC.

The program can be used on Windows XP,Windows Vista,Windows 7, Windows Server 2003 SP2, Windows Server 2008,Windows Server 2008 R2.

Fix it Center is in beta. It provides you almost 27 fixes. You can see the screenshot below.

Download Microsoft's Fix it Center


Hey! My friends, If you like my post you can save it using "Save Page as PDF" button below and you can even share them to your friends with social networking buttons provided below this post.

Add To Google BookmarksStumble ThisFav This With TechnoratiAdd To Del.icio.usDigg ThisAdd To RedditTwit ThisAdd To FacebookAdd To Yahoo

Friday, August 20, 2010

iedw.exe : Application Failed To Initialize Error. How To Solve it?

Many of us may have faced this problem with Internet Explorer atleast once that whenever we open some website, there is an error like :

iedw.exe Application Error – idew.exe failed to initialize
dcownin.exe application error

These errors are a result of improper function of Internet Explorer Add- On Crash Detection. This kind of error generally appears with the IE 6 and with Windows XP SP2. There could be several possible reasons for this error.

Reason 1 :
One of the most common reason for iedw.exe Application Error is some problem with RAM or Virtual memory. This add-on crash detection uses some of the RAM or Virtual memory area. If the RAM is faulty or the Virtual memory area on the hard disk is not fine or fast enough, the initialization of this idew.exe component fails.

Solution :
For Memory or RAM issues, I recommend all to use the Memory Diagnostic Tool to check the health of the RAM. For Virtual Memory area, you should run a Hard Disk Diagnostic Test to check whether the hard disk is in good health or not. If the hard disk is in bad health, the virtual memory area becomes slow or corrupt which may be the cause of idew.exe application error.

Reason 2 :
Another reason might be the idew.exe corrupted somehow. A Corrupt application has high tendency to create application error when it run.

Solution :
If the memory and hard disk diagnostic tests come out fine, the next possibility is the corrupted of add-on crash detection. This corruption can be the result of hard disk bad-sector, malicious script of some virus infection. First of all, run a full computer virus scan with any good anti-virus. After this if the problem is not solved, you can simply disable this feature of Add-On crash detection by following the instructions HERE. But turning of crash detection may interfere with other kind of error detection as well, so I don’t recommend it. Instead, see the next solution related to the IE version.

Reason 3 :
All of the internet browsers, including the Internet Explorer have some problems in them, the problems are fixed from time to time and new versions are released. If you are facing the idew.exe problem, you might most probably be using Internet Explorer version 6, in which this problem is mostly observed.

Solution :
There has been certain problems and safety issues with Internet Explorer which have been fixed and removed in the following version. I strongly recommend that you update the Internet Explorer to the latest available released version from Microsoft. You can download Microsoft Internet Explorer HERE.

Alternatively, you can try your hands on some other web-browsers like Mozilla Firefox, Google Chrome and Opera Browser if you are comfortable with trying out some other Web-Browsers.

Hey! My friends, If you like my post you can save it using "Save Page as PDF" button below and you can even share them to your friends with social networking buttons provided below this post.

Add To Google BookmarksStumble ThisFav This With TechnoratiAdd To Del.icio.usDigg ThisAdd To RedditTwit ThisAdd To FacebookAdd To Yahoo

Thursday, August 19, 2010

How To Send Fake Emails From Any Anonymous Email IDs

Well I was browsing and i found this cool thing. FAKE E-MAIL is a website to send anonymous emails meaning you can send anybody a mail from any body’s email address. With this website you can send emails, using any name you feel like, and as it asks for the sender’s email address, so you can also receive the reply in your inbox.

Here is the link for you: Fake Email


Just follow these simple steps:

1. Type the email id you want to send the email from .

2. Type in the email you would like to send it to

3. Type The message you want.

4. Now send it.

5. Check your inbox. See below:


My Experience with Fake Email:
It can be used for sending quick mails, esp. in a case when due to some reasons you are not able to log-in into your mail account. It can be used for sending inappropriate mails, as sender’s email address is mandatory, but there is no check on authenticity of the email address. But be careful, your ip and location can be traced, so, don’t misuse the service. You can play a prank on your friends.

However, using this service for some pranks to your known friends or using it as quick replacement of your mail account is not at all a bad idea, but I don’t find it useful for any other purpose. What do you think about it?

Have Fun!!

Other Related websites for sending fake and anonymous emails:

There may be many more. I know a lot more techniques ;) but let me share only these. You can do this from your gmail and outlook too. But, no sharing on that for now. Enjoy above methods.

Hey! My friends, If you like my post you can save it using "Save Page as PDF" button below and you can even share them to your friends with social networking buttons provided below this post.

Add To Google BookmarksStumble ThisFav This With TechnoratiAdd To Del.icio.usDigg ThisAdd To RedditTwit ThisAdd To FacebookAdd To Yahoo

Wednesday, August 18, 2010

Chat With Your Friends Through MS DOS (Command Prompt)

Do you want to chat or just send a private message to your friend, family member or office mates without using any fancy program? Back in my college days me and my friends uses this trick to talk inside the Computer Lab because we were not allowed to download or use any messenger services during the practical sessions. A lot of this kind of tutorial are not working because they are missing something. I will show you on how you can make it work.

1. First thing first, you must know your friends IP address and your Command Prompt.

2. Open your notepad and write this code as it is. I would advice you to copy this and paste on notepad.


3. Now save this as Messenger.bat.

Don’t run it yet… because it will not work. follow these procedures to make it work.

Go to Control Panel then click on Administrative Tools, On the Administrative Tools window click Services.


Scroll down and look for messenger. It will open the Messenger Properties.

Set the Startup Type to “Automatic” then press “Start” then OK. No need to restart your computer.

Do this also on the remote PC and your done… you can now chat without using any software. Just run the program and enter your friend’s IP to “Friend” press Enter, then enter your message press enter again… then have fun

4. Now Drag the above file (ie the .bat file) over to Command Prompt and press Enter.

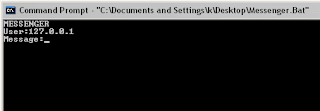
5. Now You would notice some thing like this:


6. After “User” type the IP address of the computer you want to contact and have a chat with.


7. Before you press “Enter” it should look like this:


8. Now all you need to do is press “Enter”, and start chatting Now all you need to do is press Enter, and start chatting.

Hey! My friends, If you like my post you can save it using "Save Page as PDF" button below and you can even share them to your friends with social networking buttons provided below this post.

Add To Google BookmarksStumble ThisFav This With TechnoratiAdd To Del.icio.usDigg ThisAdd To RedditTwit ThisAdd To FacebookAdd To Yahoo

Tuesday, August 17, 2010

Hidden Bluetooth Service in Windows XP and Vista


This Bluetooth service trick is an old one, but still many people are not aware that it exists in both Windows XP and Vista. So I am just publishing for my blog readers who still don't know this trick.

Most of us would either buy or download a software which would allow our Bluetooth Dongles or Bluetooth devices to communicate from the PC to mobile phones. However, with this trick, no longer need to search for a software in internet. Don't worry there is a hidden blue tooth software in Windows XP and Vista.

This is how it runs:

1. Click on Start, then on Run.


2. Now type 'fsquirt' without quotes. This will open a window with text Welcome to Bluetooth File Transfer Wizard.


3. Clicking on Next will then allow you to either send or receive a file.


4. Now just select whether you want to send or receive any file and you are done. And Click Next


5. Now You can Select Where you want to send the file or receive the file from depending on your selection from  above


NOTE: Some Bluetooth devices however require special drivers to work properly and these drivers are either supplied along with the devices or need to be downloaded. The Windows Bluetooth service nevertheless works with nearly most of the devices available on the market.

Hey! My friends, If you like my post you can save it using "Save Page as PDF" button below and you can even share them to your friends with social networking buttons provided below this post.

Add To Google BookmarksStumble ThisFav This With TechnoratiAdd To Del.icio.usDigg ThisAdd To RedditTwit ThisAdd To FacebookAdd To Yahoo

Monday, August 16, 2010

13 Surprising Logos : Fun With Logos

A logo is a graphic mark or emblem commonly used by commercial enterprises, organizations and even individuals to aid and promote instant public recognition. Logos are either purely graphic (symbols/icons) or are composed of the name of the organization (a logotype or wordmark).

Marketing is the key for success. So, if you have good commercial, your product will be sold better. Well, this article is all not about that. It’s abut stupid commercial logos (That are somewhat misleading and humorous when viewed other way)

Note: Please Click on the image to view in it's best available size.

Hey! My friends, If you like my post you can save it using "Save Page as PDF" button below and you can even share them to your friends with social networking buttons provided below this post.

Add To Google BookmarksStumble ThisFav This With TechnoratiAdd To Del.icio.usDigg ThisAdd To RedditTwit ThisAdd To FacebookAdd To Yahoo

Sunday, August 15, 2010

BatteryCare : A tool that maximize your Laptop Battery’s Life

BatteryCare is a software created to optimize the usage and performance of the modern laptop's battery

Monitoring and maximizing your laptop battery’s life becomes much easier with this free program. The program sits in your system tray like the Windows battery monitor, but gives much more information when your mouse hovers over it. It monitors the battery's discharge cycles and helps increasing it's autonomy and improving its lifetime.

It tells your battery’s percentage charged, the temperature of your CPU and hard drive, and your current power setting.


If you click the icon in the System Tray, you are shown a selection menu to change your power settings. This means you can change to your Power Saver setting with just one click.


Right-clicking the BatteryCare icon in the System Tray brings up another menu that allows you to change your power plan, adjust settings, donate to the publisher or show the program’s main information screen. Click Show at the top of the menu to see more information about your battery than you have likely ever seen.


The first screen that appear is basic information, further describing your battery’s current health. This is where you can find out how much battery life you have before finding a place to plug in.


Click Detailed Information towards the top right of the window to bring up a menu with information about your battery’s designed capacity, current capacity and wear level. This can help you predict if it is time to buy a new battery.


Clicking the Settings link at the top right of this window brings up configuration options for getting the most of BatteryCare and your battery.


Most of the general settings are self explanatory, like starting the program when Windows starts, but there are added settings to disable the Aero theme in Vista (it worked in Windows 7 too) and to pause services. This can extend your battery life at least a few extra minutes.

Download BatteryCare

Hey! My friends, If you like my post you can save it using "Save Page as PDF" button below and you can even share them to your friends with social networking buttons provided below this post.

Add To Google BookmarksStumble ThisFav This With TechnoratiAdd To Del.icio.usDigg ThisAdd To RedditTwit ThisAdd To FacebookAdd To Yahoo