Thursday, December 31, 2009

शुभकामना नयाँ वर्ष 2010 को


नेपाली मित्रहरु को लागि
नया वर्ष २०१० को पावन अवसरमा सम्पुर्ण देश विदेशमा रहनु भयका आदरणिय मित्रगण, दाजु-भाइ तथा दिदीबहिनीहरुमा सुस्वास्थ, दिर्घ जिवन यवम् उत्तरोत्तर प्रगतिको कामना गर्दै यो नया वर्ष हामी सबैमा शान्तिमय, भयरहित जिवन जिउनमा प्रेरक बनोस यहि छ मेरो शुभ कामना ।

यस नयां बर्षले सम्पुर्ण प्रत्येक नेपालीको घर घरमा खुसि ल्याओस्, सबै नेपाली दाजुभाइहरु मिलेर बस्ने वातावरणको निर्माण होस् । नेपालमा चलिरहेको दलहरु बिचको आपसी द्वन्दको अन्त्य भइ नयां नेपालको श्रिजनामा सबै नेपाली नेताहरु लागी परुन्। सबैभन्दा ठुलो कुरा त देशमा आन्दोलन, बन्द, अशान्ति, अनी लोडसेडिङ सधैंको लागि हटेर जाओस ।

सबैको खुशीले भरियोस मन, सफलताको नयाँ बनोस कहानी, नयाँ वर्षले ल्याओस सबैको जिवनमा सुनौलो विहानी, "2009 " को बिदाई "2010" को आगमनको मनोकामना, नयाँ बसन्तको पालुवाले सजियोस भन्ने मेरो शुभकामना |

For Non-Nepali Friends
We spend January 1 walking through our lives, room-by-room, drawing up a list of work to be done, cracks to be patched. Maybe this year, to balance the list, we ought to walk through the rooms of our lives... not looking for flaws, but for potential. The Old Year has gone. Let the dead past bury its own dead. The New Year has taken possession of the clock of time. All hail the duties and possibilities of the coming twelve months! New Year's eve is like every other night; there is no pause in the march of the universe, no breathless moment of silence among created things that the passage of another twelve months may be noted; and yet no man has quite the same thoughts this evening that come with the coming of darkness on other nights.

With all the Rose's Perfume & with all the lights in the world & with all the children's Smiles...May The Year 2010 Bring for You Happiness,Success and filled with Peace,Hope & Togetherness. I Wish all my friends, relatives, and my blog readers that your all dreams comes True..

- Bijay Mishra (http://biizay.blogspot.com/)
- बिजय मिश्र (http://biizay.blogspot.com/)

Add To Google BookmarksStumble ThisFav This With TechnoratiAdd To Del.icio.usDigg ThisAdd To RedditTwit ThisAdd To FacebookAdd To Yahoo

Wednesday, December 30, 2009

Some useful Nokia Codes Tips and Tricks


To check the IMEI (International Mobile Equipment Identity)

Type: *#06#

Information you get from the IMEI is:

XXXXXX XX XXXXXX X
TAC FAC SNR SP

Where,
TAC = Type approval code
FAC = Final assembly code
SNR = Serial number
SP = Spare


To check the phones Software revision

Type: *#0000#

Example of Information you get from the Software revision is:

V 05.31
18-02-99
NSE-3

Where,
1ST Line = Software revision
2ND Line = The date of the software release
3RD Line = Phone type


To enter the service menu

Type: *#92702689# (*#WAR0ANTY#)

Serial number (IMEI)
Production date (MM/YY)
Purchase date (MM/YY) You can only enter the date once.
Date of last repair (0000=No repair)
Transfer user data to another Nokia phone via Infra-Red


Clock Stopping

To check weather your SIM Card supports clock stopping

Type: *#746025625# (*#SIM0CLOCK#)


THE REBOOT TRICK

This should work on all software versions of the 6110.

1. Go to the Calendar (Menu-8)
2. Make a note or reminder.
3. Enter some text into the edit box.
4. Hold "Clear" until the whole text is cleared, then press "Back".
5. Press "0". The main screen will now be showing but a space appears on the screen. (you can't see it)
6. Enter 4 digits (e.g. 1234).
7. Use the down arrow to move the cursor to the left side of the numbers and the space (Down arrow twice).
8. Now enter 6 digits and press the call button.

Wait for a few seconds, the screen should start to flash and reboots. It should also work on other menus like the "Profiles" menu.


EFR CALL QUALITY

To activate EFR (Enhanced Full Rate) Enter the code: *3370#
This improves call quality but decreases batterylife by about 5%
To deactivate it, Enter the code: #3370#


THE JAMES BOND TRICK

If you short-circuit theleft middle and right pins on the bottom of the phone with all connections touching each other, the Nokia software hangs! The profile "Headset" will be activated. Before you do this just activate the "Automatic Answer" in the headset profile and set the ringing volume to "Mute". Now you can use your phone for checking out what people are talking about in a room. Just place it under a table in a room and call it. The phone receives the call without ringing and you can listen to what people are saying.


NETWORK MONITOR

There is a hidden menu inside your Nokia phone. If you want to activate it, you'll have to re-program some chips inside of your phone.Check your software version. You can only continue if you have v4.33, v4.73 or v5.24. Take apart the phone. De-solder the EEPROM (ATMEL AT 24C64). Read out the data with an EEPROM programmer and save it to a file (Backup). If you have v.33 or v4.73, change the address "03B8" from "00" to "FF". If you have v5.24 then change the address "0378" from "00" to "FF". Write the new data to the EEPROM and solder it back to the phone,Power on your phone and you should have "Netmonitor" enabled.

The Network Monitor gives you the following information.

Carrier number
MS RX Level in DBM
Received signal quality
MS TX power level
C1 (Path loss criterion, used for cell selection and reselection). The range is -99 to 99.
RTL (Radio link timeout).
Timeslot
Indication of the transmitter status
Information on the Network parameters.
TMSI (Temporary Mobile Subscriber Identity).
Cell identification (Cell ID, Number of cells being used).
MCC (Mobile country code)
MCN (Mobile network code)
LAC (Location area code)
Ciphering (On/Off)
Hopping (On/Off)
DTX (On/Off)
Discard cell barred information


CHECK SIM-LOCK

Note: If you bought your Nokia on UK Vodafone or UK Cellnet you do not need to check this because they both transmit on GSM900, and they don't lock the phones. However if you bought your phone on UK Orange or UK One2one your phone may be blocked. The reason is that they both transmitt on GSM1800. To make a call on GSM1800 you need what is known as a "Dual band" phone. A dual band phone is able to transmit on both GSM900 and GSM1800, so they lock the phones so you can't use it with any other network simcard. If you find that your phone is locked you can try different software to unlock it or you can ask your service provider who will gladly exchange the 10 digit code for about £35.

This is how to check the status of the 4 different locks. Aslo don't try entering the wrong number, because after 3 times it will block the phone for good.

There are 4 different locks on your Nokia phone.

COUNTRY-LOCK
NETWORK-LOCK
PROVIDER-LOCK
SIMCARD-LOCK

The code to read out the sim-lock status of your phone is #PW+(MASTERCODE)+(Y)#

Where,
# = DOUBLE-CROSS
W = PRESS "*" THREE TIMES
P = PRESS "*" FOUR TIMES
+ = PRESS "*" TWO TIMES
MASTERCODE = 1234567890
Y = NUMBER 1 TO 4

The master code is a secret code. The code has 10 digits, To read out the sim-lock status you can enter every combination you want!

"Y" Shows the status of the network-lock. Here you can enter a number from "1" to "4". The "4" is for the sim-card lock.


SIM-LOCK CHECKS

#PW+1234567890+1# = GIVES PROVIDER-LOCK STATUS
#PW+1234567890+2# = GIVES NETWORK-LOCK STATUS
#PW+1234567890+3# = GIVES COUNTRY-LOCK STATUS
#PW+1234567890+4# = GIVES SIM-CARD-LOCK STATUS.

Add To Google BookmarksStumble ThisFav This With TechnoratiAdd To Del.icio.usDigg ThisAdd To RedditTwit ThisAdd To FacebookAdd To Yahoo

Tuesday, December 29, 2009

How To Add "Recent Comments" Widget in Blogger ?


1.Log in to your dashboard--> layout- ->Page Elements

2.Click on Add a Gadget. Select HTML/Javascript.

3.Select the code given below and paste it in the widget box you have just opened above.


Note: Replace "http://yourblogname.blogspot.com" with Your own blogspot URL.

4. Now Click Save and Refresh Your site to viedw the change.

Add To Google BookmarksStumble ThisFav This With TechnoratiAdd To Del.icio.usDigg ThisAdd To RedditTwit ThisAdd To FacebookAdd To Yahoo

Sunday, December 27, 2009

How To Display Posts as Headlines in blogger ?

1.Login to blogger dashboard-->Layout > Page Elements

2.Click on 'Add a Gadget'.

3.Select 'HTML/Javascript' and add the code given below and click save.


Note: You must replace YOURBLOG (in above code) with your own blog name (Example: biizay).

You can even Customize other values as your choice:

var nMaxPosts = 15; - This code sets the number of posts in this widget.

var sBgColor; - If you want to set background color then change this code to var sBgColor= grey;

var nWidth; - Modify this code to change the width to var nWidth= 100px;

var nScrollDelay = 175; - This code is used to set the speed of scrolling. Lesser the no, higher the speed of scrolling.

var sDirection="left"; - This code sets the direction of scroll. left = Right to left; Right = Left to right; Up = Down to up; Down = Up to down

var sBulletChar="»»"; - This bullet appears before each post link in this widget. You can replace this to any other bullet.

Now you are done.

Add To Google BookmarksStumble ThisFav This With TechnoratiAdd To Del.icio.usDigg ThisAdd To RedditTwit ThisAdd To FacebookAdd To Yahoo

Saturday, December 26, 2009

How To Add "Top Commentators" Widget for Blogger ?

If you like to add Top Commentators Widget to your blog you should follow the following steps below. It will increase the commenting rate on blogs.

1.Log in to your dashboard--> layout- ->Page Elements
2.Click on 'Add a Gadget' on the sidebar.

3.Select 'HTML/Javascript' and add the code given below and click save


Note: Remember to replace yourblog (in above code)with your own blog name. Do not include http://

You are done.

Add To Google BookmarksStumble ThisFav This With TechnoratiAdd To Del.icio.usDigg ThisAdd To RedditTwit ThisAdd To FacebookAdd To Yahoo

Friday, December 25, 2009

How To Add "Posted By" Line Below The Post Title in Bog ?

1.Log in to your dashboard--> layout- -> Edit HTML

2.Click on "Expand Widget Templates"

3.Scroll down to where you see this:


4.Now "CUT" (not copy) above code and paste it in the same blog widget below this line :


5.Click on "Save Templates" and refresh your site.

You are done!!

Add To Google BookmarksStumble ThisFav This With TechnoratiAdd To Del.icio.usDigg ThisAdd To RedditTwit ThisAdd To FacebookAdd To Yahoo

Wednesday, December 23, 2009

How To Add Related Post With Thumbnails below Blogger Post?

In this post I will explain how to add the "Related Post" widget to blogger by hosting java script in blogger.

1.Login to your blogger dashboard--> layout- -> Edit HTML

2.Click on "Expand Widget Templates"

3.Scroll down to where you see </head> tag.

4.Copy below code and paste it just before </head> tag.


5.Now scroll down to where you see below code:


NOTE: If you can't find <div class='post-footer-line post-footer-line-1'> in your template,find <data:post.body> instead of it.

6.Copy below code and paste it just after above code.


Note: You can change 5 and, Related Posts in above code as your choice.

7.Now save your template and you are done.

Add To Google BookmarksStumble ThisFav This With TechnoratiAdd To Del.icio.usDigg ThisAdd To RedditTwit ThisAdd To FacebookAdd To Yahoo

Tuesday, December 22, 2009

How To Show Date,Month,Year on Blogger sidebar or in footer?

1.Log in to your dashboard--> layout- ->Page Elements

2.Click on 'Add a Gadget'.


3.Select 'HTML/Javascript' and add the code given below and click save.


You are done. Now you can see it as picture below.

Add To Google BookmarksStumble ThisFav This With TechnoratiAdd To Del.icio.usDigg ThisAdd To RedditTwit ThisAdd To FacebookAdd To Yahoo

Monday, December 21, 2009

How To Add Scrolling Text to Status Bar?

1.Login to your blogger dashboard and go to Layout --> Page Elements.

2.Click on 'Add a Gadget' on the sidebar.

3.Select 'HTML/Javascript' and add the code given below and click save.


Now you are done. Just replace the TYPE-YOUR-MESSAGE-HERE in above code with your own texts!!

Add To Google BookmarksStumble ThisFav This With TechnoratiAdd To Del.icio.usDigg ThisAdd To RedditTwit ThisAdd To FacebookAdd To Yahoo

Sunday, December 20, 2009

मह जोडी (मदन कृष्ण श्रेष्ठ र हरीबन्श आचार्य)का प्रहसन तथा नाटकहरु (अडियोमा)

मेरा blog readers हरु को बिशेष आग्रहले गर्दा मैले फेरी महका थप अरु प्रहसनका अडियोहरु आजको पोस्टमा राखने जमर्को गर्दै छु | यदी तपाईंहरुलाई अझै अरु पनि चाहिन्छ भने comment बक्स मा request गर्नु होला |

तपाईंहरुको सुझावको अपेक्ष्या गरेको छु | Comment box मा आफ्नो कमेन्ट दिन नभुल्नु होला है त|

नोट:
कृपया यहाँ राखिएका सबै अडियोहरु आफ्नो ब्यक्तिगत प्रायोजनका लागि मात्रै प्रयोग गर्नु होला !

यहा बाट डाउनलोड गर्नुहोस

अभिभावक

ऐना

बैंकेश्वोर

गीतैगीत

खोसिएको अधिकार पाउन

लण्डन एअरपोर्ट

पराल्य्सिस

वार्ड नम्बर ३४

Add To Google BookmarksStumble ThisFav This With TechnoratiAdd To Del.icio.usDigg ThisAdd To RedditTwit ThisAdd To FacebookAdd To Yahoo

Saturday, December 19, 2009

How To Solve The Problem Of Hard Disk Free Space Reducing Automatically in Windows Vista and XP?

One of my blog reader(Santosh Bro!)says:

"Mero computer ko hdd memory ko free space kehi download na garda pani ghatirako chha k vayako ho ani ma samaya samaya ma clean up pani garirako chhu. Need Solution!."

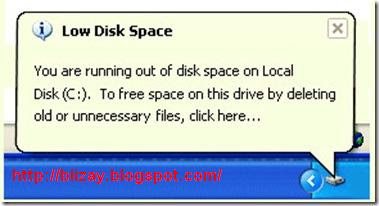
The free disk space reduces automatically on computers in case of most of windows XP and Windows Vista computers. This is quite a common problem and there are two simple reasons behind it.

Lets see the problem and the fix in detail.

The two main reasons for reduction in free disk space are:
(1)Indexing of NTFS Drives for Windows Search
(2)System Restore Data Accumulated over time

What is drive indexing and how to stop it?
Indexing is a way of storing the important keywords of the files locations and content in a index space. This way, when you search some file or folder, windows will look in the index of the drive first of all and will not look into the real files and folders at that moment. This makes the searching fast. The Indexing data created for the NTFS drive for Windows search consumes noticeable disk space. You can stop the indexing service, this will free up the space consumed by the index but it will make searching a bit slow.

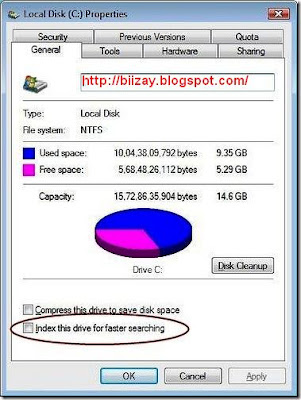
To stop Windows Indexing for a drive, right click on the drive and in general properties of the drive, un-check the options "Index this drive for faster searching" and click OK.

How to remove old system restore data?
From time to time, especially when you install new softwares etc on your computer, Windows will create System Restore Points, so that your computer can be restored to a previous state in case some problem comes. You should delete very old restore points which you are very unlikely to use.

As a part of system restore utility, windows creates some check-points and saves corresponding data on each disk having restore feature. These files also consume significant space. You can delete all of them except the most recent restore point data if you feel that your computer is running stable for a long time and you may not need very old restore points.

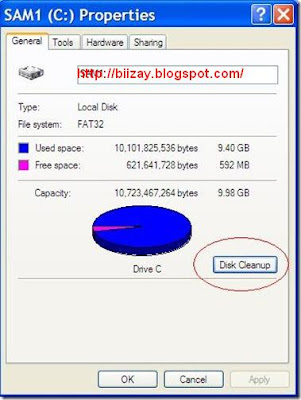
To delete it, Open My computer, right click on the disk drive , go to properties.
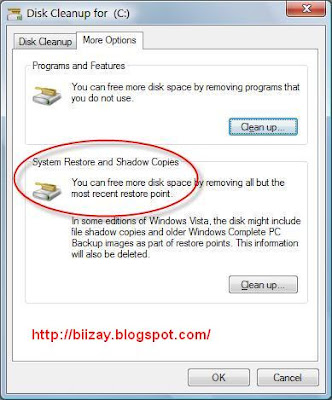
click on Disk Cleanup and click on More Options tab as shown below:

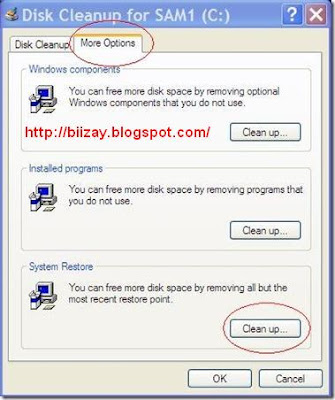
Click on System restore clean up button as highlighted in red circle in image above. This will give a warning message, click yes to it. This will delete all old restoration points except the most recent one.

Some Other Reasons and Fixes for consumption of free space
(a)Temp files on C drive
(b)Temporary Internet files and Backup files created during installation
(c)Duplicate copies of large files like movies, songs etc.
(d)Deleting Uninstall files for windows updates.

1. Deleting Temp files:
Temp files are the files which are created for some temporary purpose by many softwares.
Go to Start > Run type “%temp” (without quotes) and press enter.
This will open a Temp folder, at this folder select and delete all files at this location.
After this empty your windows recycle bin.

Note: You may not be able to delete certain files as they might be in use, but delete as many as you can.

2. Deleting Temporary Internet files and backup files:
There are several ways to do it, but we will tell you the most convenient way.
Open My computer, right click on the disk drive , go to properties and click on Disk Cleanup as shown below:

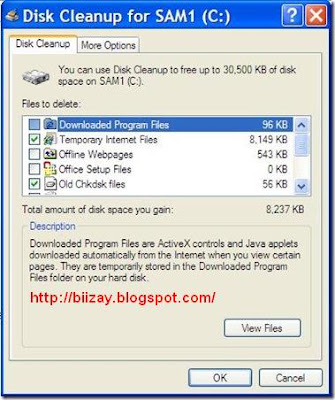
Select the temporary Internet files,recycle bin,setup log files, temporary files, office setup files, and any other option which is not very important for you and Click OK. This will start the cleanup process and will delete the un-necessary files thus increasing the disk space.

3 .Delete duplicate copies of large files:
Sometimes we have several copies of same documents, songs and even videos which consume lots of space un-necessarily. Finding them manually and deleting them is a real pain. But this work has been made very easy by double-killer. Its an intelligent utility which scans your drives for duplicate copies of files and gives you and option to delete them. You can download it from HERE for free.

4. Deleting Uninstall files for windows updates:
You can also delete some folders whose name starts with “$NtUninstall.” in the windows directory (for example C:\Windows ) if C drive is the primary partition.

However, They are referring to prior hot fixes, so they should be safe to delete if your system is stable with the fixes applied after windows update, and you have no intention of uninstalling them.
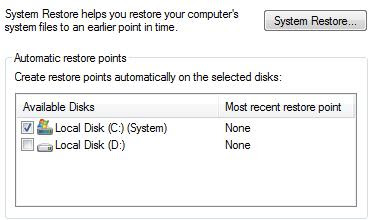
Some Other Process:

Disable and Turn Off System Restore (Shadow Copy) in Windows Vista
Right click on Computer then select Properties from contextual menu. Alternatively click on Control Panel -> System and Maintenance -> System.

In the left pane, click System Protection. If you are prompted for an administrator password or confirmation, type the password or provide confirmation.

You will see a list of hard disk drives installed on your system, with checkboxes to the left. The check boxes with tick indicate that System Restore is on for that particular volume. So to to turn off System Protection for a hard disk, clear (untick) the check box next to the disk.

Once you uncheck the checkbox, a System Protection dialog box will appear. Click on Turn System Restore Off button.

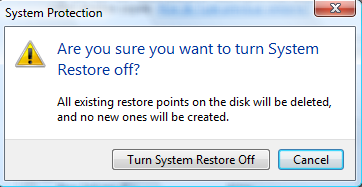
Click OK and System Restore is now off.

To revert and enable or turn on System Protection for a hard disk, simply select (tick) the check box next to the disk, and then click OK.

How To Release Disk Space from System Restore and Shadow Copies?
To release the reclaim space used by System Restore, simply follow the steps:

(1)Click Start button.
(2)Type clean in the Start Search box.
(3)Click Disk Cleanup from the search results list.
(4)Select Files from All Users on this computer option.
(5)Click OK on Disk Space Cleanup Manager for Windows User Access Control permission request dialog.
(6)Choose a drive letter from the drop down list, and press OK.
(7)Disk Cleanup will perform calculation to determine how much space it can free.
(8)Once done, click on More Options tab.
(9)Under the section of System Restore and Shadow Copies, click on Clean up… button.

(10)Click on Delete button when asked whether are you sure you want to delete all but the most recent restore point.
(11)Disk Cleanup will erase all old restore points or files and the space will be reclaimed for everybody use. You can check the reduced space used by restore points and shadow copies with vssadmin List ShadowStorage command.

Add To Google BookmarksStumble ThisFav This With TechnoratiAdd To Del.icio.usDigg ThisAdd To RedditTwit ThisAdd To FacebookAdd To Yahoo

Friday, December 18, 2009

How to Remove and Hide Blogger NavBar (Top Navigation Bar)?

When browsing Blogger powered weblogs hosted on blogspot.com domain or custom domain, there is always a NavBar (Navigation Bar or Banner) that appears on top of the blog. The Blogger NavBar contains Search Blog textbox, Flag Blog to notify Blogger about objectionable contents on the blog, Next Blog link to visit another blog randomly, plus links to create a blog or sign in to Blogger.

No many visitors nor bloggers themselves may find it useful though. It’s possible to hide and remove the NavBar with a little CSS hack. The trick will not interfere or mess up with the custom layouts that webmaster has designed, and pretty safe and easy to implement. In fact, if you’re publishing the Blogger blog to own custom domain with FTP or SFTP, it’s possible to turn off NavBar.

Remove and Hide NavBar in Blogger Widget Template
Sign in to Blogger.

On the Blogger Dashboard, click on the Layout link of the blog that you want to disable its NavBar. You can also click Customize on NavBar while visiting your blog.

Under the Layout tab, click on Edit HTML tab to view the template’s HTML code.


Search for the following line of code:


Before this code, add the following line of code:
#navbar { display: none; }

or
#navbar-iframe { display: none !important; }

Click on SAVE TEMPLATE to make the change effective.


Remove and Hide NavBar in Blogger Classic Template
Login to Blogger.

On the Blogger Dashboard, click on the Template link of the blog that you want to disable its NavBar. You can also click Customize on NavBar while visiting your blog.

The Edit HTML page under Template tab should be loaded. If not, go to the tab.

Search for the following line of code:


Then, add the following line of code before that line:
#navbar-iframe { display: none; }

The Blogger Classic Template uses iframe to load the NavBar, and styles it with ID named navbar-iframe. The name actually also works for new Blogger Widget Template too.

After hiding the Nav Bar in Blogger using Classic Template, there tends to be a gap that replaces the navigation bar. The gap may be white, red, green, blue, or black in color, depends on what is your background color. To remove the gap, find the following code (normally near the top of the HTML):


Add in the following line of code after the body tag:


Click on SAVE TEMPLATE CHANGES button when done.

Tip: To display and show NavBar again, just remove and delete the additional codes that have been added.

Add To Google BookmarksStumble ThisFav This With TechnoratiAdd To Del.icio.usDigg ThisAdd To RedditTwit ThisAdd To FacebookAdd To Yahoo

Wednesday, December 16, 2009

हरिबन्श आचार्य र मदनकृष्ण श्रेष्ठको केही पुराना र नयाँ हास्य ब्यङ्यका गीत, प्रहसन तथा नाटकहरु

आज मलाई हरिबन्श आचार्य र मदनकृष्ण श्रेष्ठको केही पुराना र नयाँ हास्य ब्यङ्यका गीत तथा नाटकहरु पोस्ट गर्न मन लाग्यो | साथीभाइ तथा इष्ट मित्र हरु लाई मन पर्ने हो हैन ? यो ब्लग म technical stuff हरु राख्दा राख्दा सबैजना वाक्क भए होला भन्ने ठानेरनै मैले आज यो पोस्ट गरेको छु | यदी मन पर्‍यो भने request गर्नुस् म अझै हरिबन्श आचार्य र मदनकृष्ण श्रेष्ठका थप अरु गीती नाटक र प्रहसनको अडियोहरु राख्दै जानेछु |

नेपाली कला क्षेत्रमा तीन दशकदेखि निरन्तर छाइरहेका मदनकृष्ण श्रेष्ठ र हरिवंश आचार्य (मह) जोडीको प्रस्तुति हेर्न आज पनि दर्शक उत्तिकै मरिहत्ते गर्छन्। दुवैको पहिलो प्रहसन ब्याङ्केश्वर देखि हाल टेलिभिजनमा प्रसारण भइरहेको मदनबहादुर–हरिबहादुर सम्म आइपुग्दा महले नेपालीमाझ जनकलाकारका रूपमा विशिष्ट पहिचान बनाइसकेका छन्।

विज्ञापन, दशैँ, १५ गते, भकुण्डे भूत, रात, लक्ष्मी होस् या लालपुर्जा, कान्तिपुर, राजमार्ग या टिकेको तीन मन्त्र, मह चौतारी– मह जोडीका सबै प्रस्तुतिले दर्शकमा अमिट छाप छाडेका छन्। तीन दर्जनभन्दा बढी टेलिसिरियल, डेढ दर्जन चलचित्र र सयाँै रङ्गमञ्चका प्रस्तुतिहरूले विषयवस्तु र अभिनय क्षमताका कारण पनि दर्शकमा अमिट छाप छाडेका छन्। दर्शकको बढ्दो मागकै कारण महका पुराना प्रस्तुतिहरूको अडियो 'एमपी थ्री'मा एकैसाथ बजारमा आएको छ भने पुराना टेलिसिरियलहरू पुनः प्रसारणको पालो पर्खेर बसेका छन्।


Download Links:

1. Dhumraketu

2. Dui Chaurele Chasma Laye

3. Hoste Hainse

4. Kock Fight

5. Maha Dohori

6. Mandal Geet

7. Nepal Bandh

8. Nilo Aankha Khairo Kapal

9. Puraskaar Vitaran

10. Raddi Tokari

11. Radio Prasnouttar - 1

12. Shaheed Geet

13. Shanti Geetinatak

14. Sradhha

15. Wrong Number

16. Yamalok

More to come ... Just make your request in comment box!!

Add To Google BookmarksStumble ThisFav This With TechnoratiAdd To Del.icio.usDigg ThisAdd To RedditTwit ThisAdd To FacebookAdd To Yahoo

Monday, December 14, 2009

How To Integrate Internet Download Manager (IDM) Into Google Chrome?

I was just going through some of the feedbacks and requests i got from my blog visitors asking for suggestions and some problems solutions they were facing. This one is for Indra Parajuli ji for his request.

Internet Download Manager [IDM] is one of the best download accelerators (मलाई सबैभन्दा मन पर्ने र मैले यूज गरी रहेको डाउनलोडर ) as it can accelerate the download speed 5 times the original speed. If you are a Google Chrome fan then unfortunately there is no specific option for IDM to integrate it with this browser. But IDM provides you with another option called "Advanced Browser Integration", with the help of this option you can even use IDM through your Google Chrome.

Here is a step by step procedure how you can use or integrate Internet Download Manager in Google Chrome.

Note: I am assuming u guys have already Installed IDM and Google Chrome.

1. Now open Internet Download Manager
2. Choose Downloads from menu bar and then select Options

3. Now check "Use Advanced Browser Integration".

4. After checking the check-box, you will be prompted for system reboot.

5. Save your important work before system may reboot. Click “Yes

6. After reboot, don't start Google Chrome, again go to the IDM options and this time check "Detect new applications that try to download files from internet".

7. You will be asked to restart Internet Download Manager.

8. After re-initializing the IDM, you will be able to see Google Chrome in the browser's list.

Now whenever you will try to download a file from Google chrome, you will be prompted to download it with Internet Download Manager, enjoy downloading!!

Add To Google BookmarksStumble ThisFav This With TechnoratiAdd To Del.icio.usDigg ThisAdd To RedditTwit ThisAdd To FacebookAdd To Yahoo

Sunday, December 13, 2009

How to include Signature at the end of post of the blog?

Do you know how to keep signatures attached on the blogger post at the end of every articles. If you don't know and you are interested in enclosing it on your blog but confused where and how to include the Signature than I am helping you with this blogging tip.

You have to do some steps; creating your Signature image, uploading your Signature image to Image hosting, and placing the code of your Signature image into blogger.

Below are the details:

Creating your Signature Image
The first step you have to do is creating signature image like I have done as below:

To create such image, you can use any software or program such as MS Paint at Microsoft Windows, Adobe Photoshop, Corel draw, banner maker, or any software. You can also create it online on the site of Online Signature Creator such as http://www.123pimpin.com, http://mylivesignature.com and many more. Or, simply you can write a signature in a blank paper and scan it.


Uploading your Signature image to Image Host
If you have already owned your Signature image, the next step you should do is uploading it to the Host that you usually upload your image, for example, you can upload it the free image host such as http://imageshack.us, http://photobucket.com, http://flickr.com, http://tinypic.com, and many others.

After you upload your Signature image, take the Web HTML code of your Signature image.


Now Copy this code from HTML for Websites


And Change into like this:


Placing the code of your Signature image into Blogger
The last step is installing the code of your Signature image to Blogger; follow these steps:

Login to Blogger with your ID

Click Settings

Click Formatting tab.

Scroll down the page, placing the code of your Signature image into the text area beside the words Post Template

Click SAVE SETTINGS button

Click Posting tab, and automatically your Signature will always appear on Posting editor (See in Picture it is showing code at moment!!).

Please create new post as usual than u can see like this on each post!!

Done!!
.

Add To Google BookmarksStumble ThisFav This With TechnoratiAdd To Del.icio.usDigg ThisAdd To RedditTwit ThisAdd To FacebookAdd To Yahoo

Saturday, December 12, 2009

How To Add a Feedjit Live Traffic Feed Widget to Blog?

Feedjit is a free live traffic widget. It provides real time traffic. It Is free of cost to install at your blog or websites. With this widget you can easily track your visitors. Adding a Feedjit widget to your Blogger blog is easy. All you have to do is to add a HTML code.

This widget tell you about last ten visitors to your blogger blog. It tells -

1.Their country and city
2.The site from where they came.
3.The page they read.

By clicking watch in Real Time, you can track more than 30 visitors.

Steps to add Feedjit Live Traffic Widget

1.Go to Feedjit.

2.On this page you will see four widgets. Choose the left most one, Live Traffic Feed.

3.Click on the customize link and cutomize it according to your preferences. You should choose colors which blend with your blog.

4.Now copy the code.

5.Go to your blog, select layout -> page element.

6.Click add a gadget in sidebar and then click HTML/JavaScript.

7.A new window will pop up. Paste the code in the window and give it a title.

8.Click save and move the widget to your favourite location.

9.Preferably place the widget in right sidebar.

10.In the options, click ignore my browser otherwise it will keep on counting your visits.

That’s all! Take care of colors while customising.
.

Add To Google BookmarksStumble ThisFav This With TechnoratiAdd To Del.icio.usDigg ThisAdd To RedditTwit ThisAdd To FacebookAdd To Yahoo

Friday, December 11, 2009

How to add Recent Posts, Recent Comments and Random Post Widgets in Blogger?

To increase the number of page views per user you need to add links so that the user does not leave the site.

This can be solved by adding links to other posts. You can display recent posts and recent comments just by following these simple steps:

1.Go to Layout>Page Elements
2.Then click on Add Gadget
3.Then click on the Feed Gadget
4.For the Recent Posts widget put the following link in the Feed url:

http://Your-blog-name.blogspot.com/feeds/posts/default
Your-blog-name – Should be link of your blog (e.g biizay.blogspot.com)

Now just change the title to Recent Posts and then click save.
After saving the widget you can drag it to any place of your choice.

5. Similarly to add the Recent Comments put the following link in the Feed url:
http://Your-blog-name.blogspot.com/feeds/comments/default

The only drawback of these widgets is that they can show maximum five links.

What is Random Posts Widget?
This widget displays random links of posts from your blog. This is differant from Recent posts or Popular Posts. This widget helps you as it brings some unpopular posts to your visitors.

How can I get this widget?
Sign in to Blogger >> Layout >> Page Elements >> Add a Gadget >> HTML/Java Script.

Now add following code in that:


Now save it.

Note:
numofpost=6 - It shows no. of random posts to be displayed.
wordnumber=5 - It shows length of post summary

Add To Google BookmarksStumble ThisFav This With TechnoratiAdd To Del.icio.usDigg ThisAdd To RedditTwit ThisAdd To FacebookAdd To Yahoo

Wednesday, December 9, 2009

How to Burn Blogger RSS Feeds at Feedburner?

In this tutorial I will guide you through the step by step process of burning your Blogger feed at Feedburner, updating your blog settings to reflect the new feed and adding a RSS icon to the sidebar of your blog so your visitors can subscribe to your new RSS feed. Although redirecting your blog feeds through Feedburner is relatively straightforward I will be including some tips to simplify the process. This tutorial is suitable for all levels of technical knowledge but is particularly aimed at those readers new to blogging with Blogger.

There are lots of good reasons for burning your Blogger feeds with a free service like Feedburner. Among the advantages are better feed presentation, detailed tracking statistics and access to the large choice of feed readers available.

How to Burn Your Blogger RSS Post Feed at Feedburner

1. Go to Feedburner, and click on the Get Started link

2. Sign in to your Google Account if not already signed in. This will take you to your Feedburner Account page.

3. Enter the name of your blog in the Burn a Feed Right This Instant box and click the Next button

4. A message will be displayed that you have more than one feed and asking you to choose. Select the RSS radio button for the RSS feed and click next


5. Feedburner will now display the proposed Feed Title and Feed Address. Unless you have a reason to change these accept by selecting the next button

6. You will now see the confirmation screen letting you know your feed has been burned. Select the Next Button to set up Feedburner Statistics options


7. Check the I want more! statistics box to give you access to additional tracking statistics. Click on the next button

8. Feedburner will now inform you that it has successfully updated the burned feed you have just created.

9. Click on the Feedburner Analyze Tab at the top of the page and you will be taken to the Analyze Feed Stats Dashboard. At this stage you will receive the message: Your feed is so new, we’re still playing with the bubble wrap. It can take about a day before you will be able to see much action on your feed

10. Under the title of your blog's feed in this screen click on edit feed details. This will give you the new name and URL for your feed.

Copy the full feed address into Notepad or similar. Care needs to be taken as you will need to copy this in two parts. The new feed URL should be something like this:

http://feeds2.feedburner.com/YourBlog

11. In a new window login to Blogger.com and navigate to the Settings > Site Feeds section of your blog

12. Click on the Advanced Mode to switch from the basic mode.

13. Make sure that the Blog Posts Feed, Blog Comment Feed and the Per Post Comment Feed are all set to Full.

14. Paste the URL address of your new Feedburner feed in the feed address box provided. This is the URL address that you copied into Notepad previously

15. If you don't already have a copyright notice in the Post Feed Footer it is a good idea to enter one. I tend to use something like the following:

Copyright Your Blog Name @ yourblogname.blogspot.com

16. Click on the Save button

17. Return to Feedburner and click on the Publicize tab

18. Follow the friendly graphic link to chickletize your feed. This will provide you with the code to place an RSS icon on your blog with a link to your new burned Feedburner feed

19. Choose the large orange icon entitled "Subscribe in a Reader" as we will be placing it in the sidebar of your blog.

20. Copy the code at the bottom of the page by right clicking the mouse and then select all from the menu followed by right click the mouse and then select copy

21. Return to your blog and navigate to Layout > Page Elements

22. In the sidebar select Add a Gadget and then HTML/Javascript. Paste the code into the content box by right clicking the mouse and selecting paste

23. Enter a title if you wish. I like to use Subscribe for Free myself as for a lot of people subscriptions often mean there is a cost involved.

24. Save your new widget

25. Use the drag and drop feature in the sidebar to position the widget in your desired location. Click on Save

26. Click on View your Blog to see your new RSS icon in the sidebar. If you now click on the RSS icon you will see your new Feedburner post feed in action

This tutorial has shown you how to burn your Blogger Blogspot Feed at Feedburner, update your Blogger settings to take account of the new feed URL address and add a RSS icon link to your blog's sidebar which points to your Feedburner post feed.
.

Add To Google BookmarksStumble ThisFav This With TechnoratiAdd To Del.icio.usDigg ThisAdd To RedditTwit ThisAdd To FacebookAdd To Yahoo