Saturday, October 31, 2009

How to enable JavaScript in the browsers?

What is JavaScript?

JavaScript is a scripting language which enables Web authors to design interactive Web sites. Most of today's Web pages require JavaScript in order to function properly. If JavaScript is disabled in your Web browser some Web pages will not function properly.

How to enable JavaScript in the browsers?

In order to view Google ads on a website, you will need to have JavaScript enabled in your browser. To do so, please follow the instructions below:

Microsoft Internet Explorer 5 and 6
Select 'Tools' from the top menu
Choose 'Internet Options'
Click on the 'Security' tab
Click on 'Custom Level'
Scroll down until you see section labled 'Scripting'
Under 'Active Scripting', select 'Enable' and click OK
This concludes enabling JavaScript for Microsoft Internet Explorer 5 or 6.


If the problematic Web page (which did not work without JavaScript) is still opened inside Internet Explorer, simply press the 'F5' key on your keyboard to reload it. Now it should work correctly.

Microsoft Internet Explorer 7
Select 'Tools' from the top menu
Choose 'Internet Options'
Click on the 'Security' tab
Click on 'Custom Level'
Scroll down until you see section labled 'Scripting'
Under 'Active Scripting', select 'Enable' and click OK
This concludes enabling JavaScript for Microsoft Internet Explorer 7


Netscape Navigator
Select 'Edit' from the top menu
Choose 'Preferences'
Choose 'Advanced'
Choose 'Scripts & Plugins'
Select the 'Enable JavaScript' checkbox and click OK

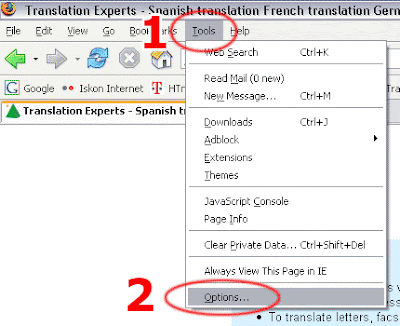
Mozilla Firefox 1.5
Select 'Tools' from the top menu
Choose 'Options'
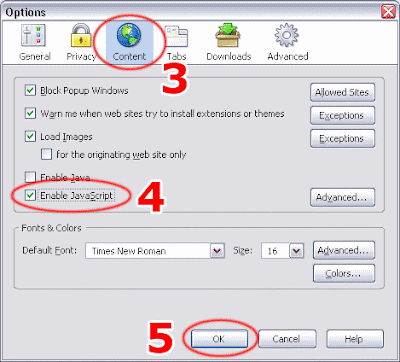
Choose 'Content' from the top navigation
Select the checkbox next to 'Enable JavaScript' and click OK


If the problematic Web page (which did not work without JavaScript) is still opened inside Firefox, simply press the 'F5' key on your keyboard to reload it. Now it should work correctly.

Note: This procedure applies to older and/or future versions of Firefox as well, with minor differences. The most important step is to find the 'Enable JavaScript' option and check it.

Opera 8 and 9
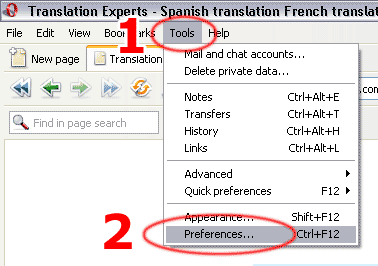
In Opera click on the 'Tools' menu
select 'Preferences'
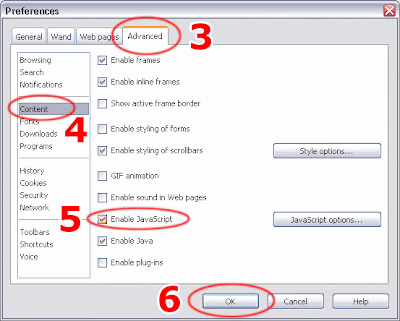
Click on the 'Advanced' tab
Click on the 'Content' option
Check the 'Enable JavaScript' checkbox
Finally click on the 'OK' button
This concludes enabling JavaScript for Opera 8 or 9.


If the problematic Web page (which did not work without JavaScript) is still opened inside Opera, simply press the 'F5' key on your keyboard to reload it. Now it should work correctly.

Note: This procedure applies to older and/or future versions of Opera as well, with minor differences. The most important step is to find the 'Enable JavaScript' option and check it.

Apple Safari
Select 'Safari' from the top menu
Choose 'Preferences'
Choose 'Security'
Select the checkbox next to 'Enable JavaScript'

AOL 7.0 and above
Select Preferences from the Settings menu.
Click Internet Properties (WWW) under Organization.
Click the Security tab.
Check the Custom Level button.
Scroll down to locate Scripting.
For Active Scripting click Enable.
Click OK, and then OK again to close all dialogs.
Close the Preferences window, and then Reload the page.

Please keep in mind that upgrading your browser or installing new security software or security patches may affect your JavaScript settings. It is a good idea to double-check that JavaScript is still enabled if you notice problems displaying Google ads. Additionally, if your JavaScript setting is set to 'Prompt', you may encounter a warning about downloading potentially dangerous scripts from a website that displays Google ads.

If you are still experiencing problems viewing the ads after ensuring that JavaScript is enabled in your browser, please check if you have any personal firewall or security software installed.

Add To Google BookmarksStumble ThisFav This With TechnoratiAdd To Del.icio.usDigg ThisAdd To RedditTwit ThisAdd To FacebookAdd To Yahoo

Wednesday, October 28, 2009

Slumdog Millionaire (2008) - Mistakes in Movie

1. When Latika is a dancer, in one shot she does not have a nose ring, but in another shot she does.

2. On the final question, it is displayed on TV as "Dumas'", but on the close-up of the on-stage monitor, it says "Dumas's".

3. When Jamal's gang steals parts of the car, Jamal is hit by the driver and gets his left eye swollen. However, in the scene when he washes his eye, his reflection in the water shows that 'his' right eye is swollen, then in the next scene it is his left eye that is swollen.

4. When Jamal is lowered from the roof of the train, Salim is seen from below leaning way over the edge of the train. Because of the curvature of the roof, and the fact that he was supporting Jamal but the rope wasn't anchored to anything, there's no way Salim could have leaned over that far.

5. Jamal follows his brother to Javed's house and sees Latika. Later he is forced to leave the house, and while standing at the door, the collar of his shirt is lifted. Then the shot switches to Latika and when it returns to Jamal, the collar is in place. The shot changes again and as he stands outside, the collar is lifted again.

6. When Jamal follows his brother to Latika, the car changes; see both the right tyres.

7. When Jamal followed his brother to his house he wore a light blue polo, but when he entered the house and got a chance to speak with Latika, it changed to a blue dark printed polo.

8. In the song 'Jai Ho', at a certain point the time display in VT station shows 00.58.37, but in the next scene the time is 00.58.33.

9. When Jamal arrives on a train to VT station, he is travelling on the first track. When he alights from the same train, he is on the second platform.

Add To Google BookmarksStumble ThisFav This With TechnoratiAdd To Del.icio.usDigg ThisAdd To RedditTwit ThisAdd To FacebookAdd To Yahoo

Export all email from Gmail

One of the easiest solutions is to download all your Gmail emails to an email client such as Microsoft Outlook or Mozilla Thunderbird. In order to do this, you first have to setup your Gmail account properly.
Enable POP3 or IMAP Access

First, go to your Gmail account and click on the Settings button at the top right. Now click on the Forwarding and POP/IMAP tab.

Now depending on the email client you are using, you can choose to enable POP, IMAP or both. If you want to download all of your emails, make sure to choose the Enable POP for all mail option.

Note that you can read the full instructions on how to setup your email client by clicking on the Configuration instructions link right below the IMAP Access section.
Move Email to Inbox

Secondly, depending on which client you are using, you may have to temporarily move all your archived emails back into the Inbox so that they can be downloaded by the email client.

The nice thing about Gmail is that this is not really hard to do and it’s not hard to re-archive everything after the mail has been downloaded.

Log into your Gmail account and click on All Mail in the left hand column. Now click on the All link next to the Select option and you’ll see a new option to select all the email in your account from the very beginning.

Go ahead and click on Select all XYZ conversations in All Mail. Now simply click on the Move to Inbox button. This will move everything to the Inbox and will retain all your labels, so don’t worry about that.

Finally, you’ll go ahead and follow the instructions to setup Gmail with Outlook or Thunderbird and your emails should begin downloading. Depending on how many emails you have, it can take quite a while for everything to get downloaded.

Also, be sure to check the box to Leave a copy of the message on the server. You don’t want to download the emails and have them deleted from Gmail.

Add To Google BookmarksStumble ThisFav This With TechnoratiAdd To Del.icio.usDigg ThisAdd To RedditTwit ThisAdd To FacebookAdd To Yahoo

Monday, October 26, 2009

How to Add Social Networking Icons to Your Blog

Adding social networking icons in the sidebar of a blog makes it really easy for people to share and save your content. Making this easy allows for your content to go "viral" or reach a much larger audience because people can share it.

Instructions

1. Find the social networking icons you like.

You can find button images from many places. (see links given below) When you find the ones you like save them to your computer.

2 Host your social networking icon images.

Upload your images using FTP to your hosting service.

3 Grab your image url.

You will need the url where your images are being hosted, whether it’s on your own hosting or someone else's.

4 Add a widget to your sidebar.

Add a "text" widget for wordpress, or an html/javascript gadget in blogger.

5 Use html to make your social networking icons clickable.

See resources for the code you need to use in these links:
http://mysocialbuttons.com/
http://www.w3schools.com/htmL/html_links.asp

6 Save changes to the widget/gadget.

Add To Google BookmarksStumble ThisFav This With TechnoratiAdd To Del.icio.usDigg ThisAdd To RedditTwit ThisAdd To FacebookAdd To Yahoo

Sunday, October 25, 2009

How to Add Facebook Share Button on Each Post ?


Now you can see a sharecount button for Facebook on each and every post (Look at right side of the post). With the help of that, You can now easily share the content/articles to your facebook friends with one click.

Inspired by the popular Retweet buttons, the sharecount button for Facebook displays the number of times the current page has been shared on Facebook and allows visitors to share it themselves.

Features:

* Displays the number of shares and on hover the total number of clicks for those shares (displays Facebook logo when 0 shares)
* Large or small button.
* Track the shares from the button using your awe.sm API Key or fbshare.me links.

If you're a Blogspot User - then Embed this code on your template :

How to Add this Button on each and every post ?

1. Go to Blogger.com

2. Go to Layout > Edit HTML >

3. Save a copy of your template, so that if anything happens while editing you can restore it.

4. Now click on Expand Widget Templates and Search for

5. Now Paste the following code below this line

6. You're Done !! Now save your template and Enjoy Sharing on Facebook !!

Add To Google BookmarksStumble ThisFav This With TechnoratiAdd To Del.icio.usDigg ThisAdd To RedditTwit ThisAdd To FacebookAdd To Yahoo

How to fix "This program is not responding" error?

Introduction To “Program Not Responding”
Scenerio 1: You’re sitting in front of your PC and you decide to open an application. You double click the icon and you are now looking at an hour glass. You continue to wait and watch as the hour glass keeps spinning. Finally after two to three minutes you get the dreaded message, “Program Not Responding”.

Scenerio 2: You’re currently working with an application such as Excel. You have spent over an hour putting together a killer spreadsheet, when all of the sudden the program locks up and freezes. Finally after two to three minutes you get the dreaded message, “Program Not Responding”.

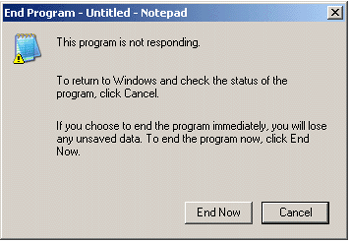
Does this look familiar?

In this case, the Windows program “Notepad” is not responding. This of course can happen to any application. Ok, now sit back and relax while I will explain how to get rid of this annoyance.

The most popular questions we receive surrounds the fact that people want to know why in the world this happens? There are several reasons for this annoying entity.

First, as you add and remove programs, your system files become scattered throughout your hard drive. This term is called, “fragmented”. Sometimes running your disk defragmenter utility will fix the problem but don’t be surprised if it doesn’t.

Another reason for this is your PC could be infected with melicious SpyWare or AdWare. These tiny programs which run in the background of your PC monitor your every move and slow your computer down to a crawl.

Unfortuneatly one of the symptoms from these programs is receiving the dreaded “Program Not responding” error message.

The third reason (and most common) is a corrupt system registry. As you install and un-install programs, your registry can become corrupt and unstable.

Just as your car needs regular tune ups, your PC also needs regular maintenance. RegCure can solve your “Program Not Responding” messages!

Once you have rid your system of unwanted SpyWare and AdWare, and ran your first ‘clean up” scan, it is important to make sure your system registry is cleaned at regular intervals. How so? By using RegCure!

Download it from here: http://www.freewarebox.com/free_14975_regcure-free-registry-cleaner-scan-download.html


For Internet Explorer Error:

lets explore the add-ons first.

With internet explorer open, click on the Tools menu and go to Internet options.
Click on the programs tab and then click on manage add ons.
For each item in the "show" box, go through the list and enable or disable the items individually. Don't worry, if you screw anything up, you can simply enable them again later.

To speed up the process, disable them in this order:
1. active X controls
2. toolbars
3. Browser helper objects
4. anything from a publisher you've never heard of before
5. anything that's not microsoft.
If you have found the culprit, you can either leave it disabled, or you can permanently remove it.

Add To Google BookmarksStumble ThisFav This With TechnoratiAdd To Del.icio.usDigg ThisAdd To RedditTwit ThisAdd To FacebookAdd To Yahoo

Tuesday, October 20, 2009

How to use Trial Version software forever without Expiration?

Now we download stuff almost daily. New products pop out so often. You can use any software forever you want. You can download trial version, right. Trial version expires after some days. You can stop that expiration. You can tell trial version of the software to not count days or do not bother about time. The software will stay and keep working like original software forever and will not expire or cease to work. You do not have to change your system clock. This little software does it all.

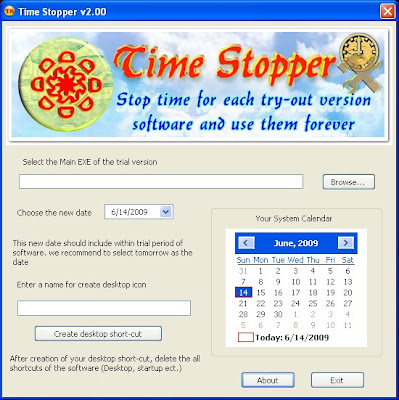
Time Stopper is the software which can stop the time for try out version software. When you stop the time you can use your try-out versions forever. When you stop the time of a try-out version using this Time Stopper it works via this Time Stopper. Real time and date run normally on your system. You can use any number of try-out version softwares with this software.

How it Works?
1. Open Time Stopper
2. Browse and select .exe of required trial software
3. Choose the new date (Any date which occurs in between your trial software time period before expiration, suggestion: set it to two days before trial software expiration date.)
4. Choose any time
5. Click open software on your selected date

If you wish to create an icon for your modified trial software and do not want to open Time stopper every time then use last button in software to create new icon. open that trial software after that from that newly created icon always otherwise it can expire.

Size: 844 KB
Download Time Stopper from http://download.cnet.com/windows/3055-2056_4-10868250.html?tag=pdl-redir

Add To Google BookmarksStumble ThisFav This With TechnoratiAdd To Del.icio.usDigg ThisAdd To RedditTwit ThisAdd To FacebookAdd To Yahoo

How to convert Batch file(*.bat) to an Exe file(*.exe)?

If you are making a batch file for some work and don’t won’t to share the source code of that batch file then this post may helps you by converting batch file(*.bat) to an (*.exe) file. This gives professional look to your work(after converting batch file to exe file it seems like a software).

Steps to convert a batch file(*.bat) to an Executable file(*.exe):

First download the Batch To Exe converter Here (http://www.f2ko.de/English/b2e/download.php)

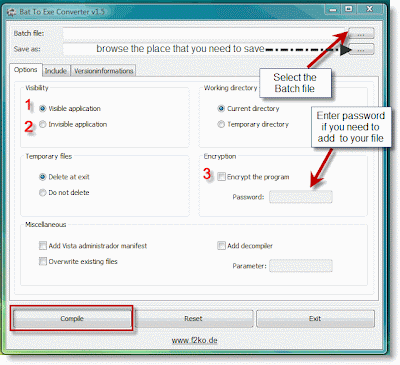
Select the Batch file that you need to convert in Batch File to an Exe File

Select the path where to save the EXE file

In option tab see visibility option this option determines how to run your exe file there are two option:

Visible application(2): If you select this option your Exe file will run link a normal software i.e working of your batch file will be visible(like a normal installation)

Invisible application(3): If you select this option your batch file working process(installation) process will be hidden

Encryption(3): If you need to protect the Exe file with a password then select this option(3) and enter the password there. Whenever you run an exe file it will ask password to Run it.

To add an icon and software information to an Exe file then select the Version Information tab in this you will see the Icon adding option and software information

After completing all the above steps click on the compile button in the bottom then your Batch file will be converted to an executable file i.e and *.exe file

Add To Google BookmarksStumble ThisFav This With TechnoratiAdd To Del.icio.usDigg ThisAdd To RedditTwit ThisAdd To FacebookAdd To Yahoo

Sunday, October 18, 2009

Microsoft - The Giants are liars.

Microsoft used a cracked version of Sound Forge to create files that are inside the Windows Tour folder.The wave files have been made with Sound Forge 4.5 (The cracked version) first cracked by a cracker called "Deepz0ne".

Deepz0ne was one of the founders of the cracking group "Radium" and cracked the first ever Sound Forge 4.5, for illegal, pirate use.It seems that Microsoft have got the pirate copy, and just made the files on that.

You don't believe Microsoft Is A Liar ?
Then check the following in your Windows Xp .

1. Open C:\Windows\Help\Tours\WindowsMediaPlayer\Audio\WAV. Here you will find many audio files of .wav format.
2. Open any one of these wav files in Notepad or Wordpad.
3. In notepad you will find text in unknown format.
4. Scroll to the bottom and you will see this text 2000-04-06 IENG Deepz0ne ISFT Sound Forge 4.5.

This text 2000-04-06 IENG Deepz0ne ISFT Sound Forge 4.5 is added for those Sound Forge 4.5 which are cracked by Deepz0ne.

Now you can very well realize that Microsoft are liars, and also fakes.

We know Microsoft continues fight against piracy.As part of its Genuine Software Initiative, Microsoft has filed lawsuits against 20 resellers that have been distributing illegal copies of the company's software. If such a billion dollar company is not ready to pay for a small software(Sound Forge), why do they expect people to buy their softwares?

Add To Google BookmarksStumble ThisFav This With TechnoratiAdd To Del.icio.usDigg ThisAdd To RedditTwit ThisAdd To FacebookAdd To Yahoo

Wednesday, October 14, 2009

शुभ दिपावली


नेपालीहरूको महान पर्व शुभ दीपावली २०६६ सालको सुखद उपलक्ष्यमा समस्त पाठक, शुभेच्छुक तथा देश-विदेशमा रहनुहुने सम्पुर्ण नेपाली दाजु-भाई तथा दिदी-बहिनीहरुमा सुख, शान्ति तथा समृद्धिको हार्दिक मंगलमय शुभकामना व्यक्त गर्दछु । यसै महान पर्वले सबैको जिबनमा खुशी छाओस भन्ने कामना गर्दै दिगो शान्ती, सम्रिद्दी, अनुशासन, भाइचाराको सदभाव एवम नयाँ नेपालको परिकल्पना होस् भन्ने शुभकामना व्यक्त गर्दछु |

आउदै गरेको शुभ दिपावलीमा समस्त प्रवासी तथा स्वदेशी दाज्युभाइ दिदीमा खुशी, सुख, अमैन, चैन, दिर्घायु, सुस्वास्थ, आरोग्यता,शान्ती र समृध्दीको हार्दिक मंगलमय शुभकामना ।

साथी-भाइ सबैको भलो मंगल् हवोस्!! छरछिमेकी गाउ घर आफन्तको ममता शरदको खुशीयली छाइ रहोस् फुलिरहोस्!! सबैलाई सुख मिलोस शान्ती मिलोस!!

प्रचण्ड झैँ गफाडी नहुनु, गिरिजा झैँ घमण्डी नहुनु, माधव नेपाल झैँ दोधारे नहुनु, शेर बहादुर झैँ अनाडी नहुनु, सुर्य बहादुर झैँ सैतान नहुनु, ज्ञानेन्द्र झैँ लाचारि नहुनु..., फोरम झैँ बिखण्डनकारी नहुनु |

HAPPY DIPAWALI 2066

Add To Google BookmarksStumble ThisFav This With TechnoratiAdd To Del.icio.usDigg ThisAdd To RedditTwit ThisAdd To FacebookAdd To Yahoo

How to Make Free International Calls From Your Computer

Did you know that it's possible to make free international calls from your computer?

That's right - as long as you have an internet connection and the right hardware on your computer, it is really easy to make totally free international long distance calls.

You can now talk to your friends and relatives overseas for free using some simple software available on the internet. You should have a broadband internet connection for the best call quality, but it is possible to make calls over a dial up connection.

Here's how to make free international calls over the internet:

First of all, make sure your computer has a sound card with a speaker and microphone jack.

Look at the back of your PC and see where your speakers are connected; this is your sound card. A sound card usually has three small "holes" that are usually color coded light blue, light green and/or light pink. If you look carefully you might see symbols next to each hole indicating a microphone and speakers. Most computers that are under 5 years old will have a sound card.

If you have speakers connected, purchase a computer microphone and connect it to the microphone jack on your sound card.

If you don't have speakers, or want to have better sound quality, purchase a computer headset with microphone and connect it to the appropriate jacks on your sound card.

Download free internet phone software from the VoIP provider of your choice. (VoIP stands for "Voice Over Internet Protocol", which is the method for making phone calls over the internet).

Popular VoIP internet phone service providers are Skype, Google Talk, Windows Live Messenger, RingCentral Gizmo, Net2Phone and WebPhone. It doesn't matter which one you use - the important thing is that everyone you talk with uses the same VoIP provider.

Install the software and register for a free account. Remember the user name you choose, as this is how the people you call will know you.

Start the software and follow the instructions to configure your equipment and make a free test call to make sure everything is set up correctly.

When your equipment and software is set up and the test call is fine, email your friends and family and ask them to do the same thing you did - get a headset or microphone and speakers, go to the VoIP provider's website to download and install the software, set up a free account and make a test call.

Share your VoIP internet phone service user name with everyone you want to make calls with. Everyone should enter each other's user names into the VoIP software's "contacts" list. This is how you will "dial" and connect with your international friends and family.

Email your friends and/or family and decide on a time to talk. Make sure both parties are online, and that everyone has their internet phone service software running.

Make your international call by clicking on the person's user name within your contact list and then clicking the "dial" icon within the program. You will hear a ringing sound on your side, and the other party will hear the ringing also. They may also see a message on their computer screen telling them that you are trying to call.

When the person you are calling clicks on the "answer" icon on his/her internet phone service software, you will be connected. You can then talk to each other over the internet for free.

When done talking, simply click the "hang up" icon on the VoIP software.

This type of VoIP internet phone service is called "softphone" because it requires a computer and software to make phone calls over the internet. Calls between users of the same VoIP service provider (i.e. Skype, Net2Phone, Gizmo, etc...) are always free, so it's easy to keep in touch with international friends and relatives. If desired, you can hook up an inexpensive webcam and make free international video phone calls too!

Add To Google BookmarksStumble ThisFav This With TechnoratiAdd To Del.icio.usDigg ThisAdd To RedditTwit ThisAdd To FacebookAdd To Yahoo

Sunday, October 11, 2009

How to find a wireless access point IP address

Ever go to someone else’s place and had to figure out the IP address of their wireless network so that you could change it’s settings? Most people setup their wireless networks right out of the box without any configuration and therefore have no idea what the IP address is.

If you’re already connected to the wireless network, then it’s really easy to figure out the IP address of the router. I’ll also explain ways we can get the IP address if you’re not connected to the router.

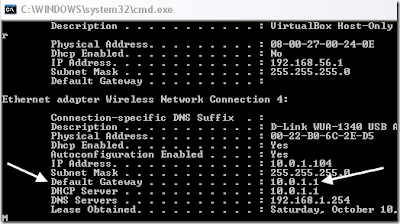
If you’re connected, go to Start, Run, and type in CMD. Then in the command prompt, type in IPCONFIG /ALL.

Scroll down till you get to the heading that has “Wireless Network Connection” in the name. The IP address of the wireless access point is the IP address that is listed for Default Gateway.

Now you can go ahead and type that address into your browser and you should be bought to the configuration page for the wireless router.

If you are not connected to the wireless router and want to find out more information about the device, then you have to use other tools to get the job done.

For example, let’s say you go to your school library and connect to the network via a wired Ethernet port, however, you know there is a wireless connection in the library, but SSID broadcast is turned off for security reasons. It’s basically an easy way to prevent people from connection to your wireless router.

In this type of case, you need a port scanner program to scan the current subnet that you are on to find all devices currently connected to the network, including the wireless router.

First, you should use a tool like NetStumbler to make sure the wireless network actually exists. NetStumbler is a program that can detect wireless networks even if SSID broadcast is turned off.

Just down and run it and it’ll give you a list of all the networks in your vicinity. Note that Windows cannot detect networks that have SSID turned off.

As you can see, it has detected several networks in my area. Now that I know the wireless network exists, we can figure out the IP address by using a port scanner. There are many port scanners including Advanced Port Scanner and SoftPerfect Network Port Scanner.

With either program, you’ll get a list of all the hosts on the current IP range, including the MAC address and IP address.

If you still can’t figure it out, then you can get hardcore and use a network sniffer and packet analyzer tool like Wireshark. If there is a computer that is connected to the wireless router, you should be able to pick it up even via the wired network connection. Enjoy!

Add To Google BookmarksStumble ThisFav This With TechnoratiAdd To Del.icio.usDigg ThisAdd To RedditTwit ThisAdd To FacebookAdd To Yahoo

Saturday, October 10, 2009

Which is faster, wireless router or wired internet?

As a tech person I often get asked the question which is faster wireless router connection or wired internet, and to be honest is a tough question to answer right off the bat because even though we know wired Internet speed is faster, we are left with the questions why and how, and the discussion never ends. In this post I want to discuss those why and how questions. Stick on.

Wired Local Area Networks (LAN) speed are usually 10,100, 1000 megabits per second with 100 megabits per second being the most common. The most used standards in Wireless networks these days are the specifications 802.11b and 802.11g. 802.11b operates in the 2.4 GHz band and has a maximum raw data rate of 11 Mbit/s. while 802/11g works in the 2.4 GHz band (like 802.11b) but operates at a maximum raw data rate of 54 Mbit/s, but realistically the maximum speed you can get from a 802.11g wireless device is around 20 Mbits.

With the facts already gathered above, let’s get to the question again. is it faster to use wires than wireless when navigating the Internet? The answer is: it depends how fast your Internet connection speed is, most home Internet providers offer speed ranging from 4 Mbits to 16 Mbits.

If you have a wireless router type 802.11g the Internet speed on your wireless computer will be the same as the wired one, because as I said above, a type 802.11g router will be able to reach around 20 Mbits per second. this is taking into account your wireless connection does not have much interference with other wireless devices and there are not too many people using the wireless at the same time.

Now here is another fact, if you are using the wireless computer to access files on a network the speed will be much slower, because within a network a wired computer can reach almost a 100 megabits per second connection speed; that’s almost 5 times the speed of a wireless device.

My recommendation when using wireless devices is to use them when needed. If you can hook up your computer to the Internet using a cable is better for these reasons: Less interference, more secure, and well, faster.

Add To Google BookmarksStumble ThisFav This With TechnoratiAdd To Del.icio.usDigg ThisAdd To RedditTwit ThisAdd To FacebookAdd To Yahoo

Change IP address and DNS servers using the command prompt

Changing TCP/IP settings using the GUI property is very easy and simple. But what about if you want to have more fun doing it, and change the IP and DNS properties using the windows command prompt? If you are a Linux guru or a batch scripting wizard this should not be complicated, if you are new to the command prompt, well, today is a good day to start.

We will change the IP address and DNS servers using the built-in utility in Windows called “Netsh”� is a nifty utility to change system networking settings, locally or remotely. To run Netsh click on start then RUN and type CMD press ENTER.

When the command prompt comes up type Netsh, now you should be ready to execute commands. Simple huh. Just to warm up type “interface ip show config“� that will show up the TCP/IP network settings.

Now, how you change the IP address and Default Gateway settings? To change the Local Area Connection TCP/IP settings type the following command:

interface ip set address name=”Local Area Connection” static 192.168.10.42 255.255.255.0 192.168.1.1

As you can see, when you use Netsh you need to specify what network properties you need to change, in the example above, we changed the network properties for “Local Area Connection”� then we setup a static IP address, Subnet Mask and at the end the default gateway.

Changing the DNS IP address is almost identical as the procedure above, type the following command on the Netsh prompt:

interface ip set dns “Local Area Connection” static 192.168.1.1

To Setup WINS, type the following command:

interface ip set wins “Local Area Connection” static 192.168.1.1

To set the network properties to obtain the IP address from a DHCP server, type the following command:

interface ip set address “Local Area Connection” dhcp

To set DNS to obtain IP address automatically type the following:

netsh interface ip set dns “Local Area Connection” dhcp

There you have it, a useful tool to help you on your network configuration.

Add To Google BookmarksStumble ThisFav This With TechnoratiAdd To Del.icio.usDigg ThisAdd To RedditTwit ThisAdd To FacebookAdd To Yahoo

How to fix “Cannot renew IP address” in Windows

Recently, I was working on a clients machine and after logging in realized that for some reason I was not able to connect to the server. I went to the command prompt and type in IPCONFIG and pressed Enter.

The IP address for the computer was 169.254.x.x and the subnet mask was 255.255.255.0. The 169.254 address is an APIPA (Automatic Private IP Addressing) address that is assigned when no DHCP server is available or reachable.

So I decided to run the IPCONFIG /RENEW command to renew the computers’ IP address. Unfortunately, that didn’t work either and I got the following error:

An error occurred while renewing interface Local Area Connection : An operation was attempted on something that is not a socket.

If you get this error when trying to renew your IP address, you have a problem with the WinSock configuration on your computer. Luckily, you can read my post from Online Tech Tips on how to repair Winsock errors in Windows.

However, that may not be the only reason why an ipconfig /renew would not work. You may also get an error like this:

Limited or no connectivity
You might not be able to access the Internet or some network resources. This problem occurred because the network did not assign a network address to the computer.

For example, if you have a static IP address, then renewing will never work. You can tell if you have a static IP address by typing in IPCONFIG by itself and making sure it’s something other than 169.254. If it is, then someone may have manually set your IP address.

This means that even if there is a DHCP server on the network, it won’t get a new IP address. You can set your computer to obtain an IP address from a DHCP server automatically by going to Start, Control Panel, Network Connections. Right-click on the Local Area Connection and choose Properties.

On the General tab, scroll down in the list box till you see Internet Protocol (TCP/IP) and highlight it. Then click on Properties.

Now make sure that both Obtain an IP address automatically and Obtain DNS server address automatically are selected.

Now try to renew your IP address and see if you can connect to the Internet or network. If this does not work, you have to make sure there is not some kind of software on your computer that could be blocking all the ports on your computer.

Disable any firewall software and remove or disable programs like Zone Alarm and Norton Internet Security as they can get in the way sometimes.

Finally, the problem of not being able to renew your IP address could be because of the network interface card (NIC) itself. It could be with the drivers, so download the latest drivers and update them.
You can also test out whether it is a problem with your network card by connecting the computer to another device such as a cable modem or another router and seeing if it can connect to the Internet. If so, it could be a problem with the router assigning IP addresses and it would be easiest to reset the router.

Hope this helps! If not, post a comment with your error and I’ll try to help! Enjoy!

Add To Google BookmarksStumble ThisFav This With TechnoratiAdd To Del.icio.usDigg ThisAdd To RedditTwit ThisAdd To FacebookAdd To Yahoo

Pinging works, but Internet Explorer not showing web pages

Earlier this month, I ran into a very frustrating problem on a clients’ XP computer system. All of a sudden, whenever they would try to open up a web page in Internet Explorer, the result would be “The page cannot be displayed”.

But that was not the frustrating part! This computer was working fine a few days earlier, so something had changed so that now Internet Explorer could not display web pages. The first thing we did was try to ping the websites from the command prompt, thinking that the problem was with the network card, the LAN, or something of that sort.

Pinging the websites actually worked! So now it was really weird. We could ping the websites from the command line, but could not open the page in Internet Explorer. So logically, we jumped to the conclusion that it must have something to do with the proxy settings in Internet Explorer, because DNS is obviously working correctly.

Wrong again! The proxy settings were empty. So if the problem was not related to proxy settings and the TCP/IP protocol was working fine, then what could be the problem? Well, we decided to install another browser and then open a few web pages.

It worked! So Firefox and Google Chrome could load the web sites fine, but not Internet Explorer. We thought about some crazy ideas along the way like the following:

Uninstalling and reinstalling IE
Running the Winsock fix utility
Disabling all add-ons in IE
Running SFC /SCANNOW

However, none of this made sense and we didn’t want to waste a ton of time. So after a while of brainstorming, someone came up with the brilliant idea to see what new software was installed on the computer in the last few days.

Finally, we saw that the user had installed a anti-virus program that had a built-in firewall! The firewall was set to block Internet Explorer from accessing the Internet and therefore was the culprit!

Overall, it was a very good learning experience and I thought I would share it with everyone since it can be super frustrating if you don’t think about third party applications that can cause problems like this. Enjoy!

Add To Google BookmarksStumble ThisFav This With TechnoratiAdd To Del.icio.usDigg ThisAdd To RedditTwit ThisAdd To FacebookAdd To Yahoo

Protect your Wi-Fi using MAC address filtering

Securing a WIFI network could be done using several methods and the most common (i.e. WPA and WEP) methods employ a password type of mechanism. However, I have found that securing a wireless network with just a password is not enough to defeat the very determined hackers.

However, if only trusted computers can connect to your network, that reduces your risk dramtically. The answer to this is MAC address filtering. MAC address is a unique serial number embedded in your computer. With MAC filtering you can set which specific computer is allowed to access the WIFI. This way you secure your network with passwords and filtering.

To know your computer’s MAC address, go to the DOS prompt and then type “ipconfig /all”. You should see various network setting infos like your IP address and NDS settings. The MAC address is the value of the “Physical Address”:

Now that you know how to get a computer’s MAC address you may now enter the MAC address to the list of allowed computers.

First access your WIFI’s admin console. In Linksys you can do this by browsing http://192.168.1.1 and then entering the admin’s username and password. By default the password is “admin” and no user name. Make sure to change the password as soon as you are logged in to avoid others from getting into your control panel.

Once logged in, click the Wireless tab then choose the Wireless MAC filter submenu. Choose the option to enable the Wireless MAC filter and choose Permit Only PC’s listed to access the wireless network.

Click the Edit MAC Filter List to open the list of allowed PCs on the network. On the page that will pop-up you can enter the MAC address of the computers that you want to allow in the network:

After entering the MAC address, click Save Settings to save the list of MAC address. Save the settings on the main console page to activate MAC filtering:

Only the MAC address that you entered will be allowed on the WIFI network. If you need to connect a computer make sure to enter it’s MAC address using the steps above. Computers who are not in the list will not be able to connect to the network. This will keep your WIFI eavesdroppers from stealing your WIFI connection. If you are not expecting different guests with their own computers very often then this should work for you as a security measure.

Add To Google BookmarksStumble ThisFav This With TechnoratiAdd To Del.icio.usDigg ThisAdd To RedditTwit ThisAdd To FacebookAdd To Yahoo

How to monitor your Internet bandwidth usage

As an IT guy, I monitor bandwidth usage to make sure network connections are performing at their optimum level. Sometimes I encounter a rouge software application that eats up a lot of bandwidth. Malware is notorious for eating bandwidth causing my torrent connections to perform really slow.

This led me to find ways to monitor my bandwidth on demand using a third party tool called Bandwidth Monitor Pro (see http://download.cnet.com/Bandwidth-Monitor-Pro/3000-2085_4-10217766.html?tag=mncol;pick). What it does is really simple, it shows you your current download and upload speeds together with their running average and maximum values.

First let me tell you how I use it. I use it to monitor my daily Internet usage. By doing daily monitoring, I end up with a baseline of how much bandwidth I really consume and if I really need that expensive broadband package the pretty sales lady is offering me.

See, I don’t want to sign-up for that service because she is charming – I want to make an objective decision and this tool will let me do just that. When you run the tool it shows you a line chart of your download and upload utilization. Nothing fancy about this but it is better than the chart seen on the networking tab of the task manager, which probably shows only the download utilization data.

The tool lets you record transfer history if you let it run in the background for a couple of days. It records all of your network card’s upload and download usage, the total and displays it in daily, weekly, monthly and yearly summaries. Those streaming TV series really eat a lot of bandwidth!

For basic bandwidth monitoring, Bandwidth Monitor Pro is a simple solution. It has a low RAM footprint of 10MB when showing charts and only about 2MB when recording network traffic.

Add To Google BookmarksStumble ThisFav This With TechnoratiAdd To Del.icio.usDigg ThisAdd To RedditTwit ThisAdd To FacebookAdd To Yahoo

Enable or disable Windows firewall from command prompt

There may come a time when you need to write a script or remotely connect to the terminal and run a command to enable or disable the Windows firewall. For most IT environments, using Group Policy is the easiest way to configure the Windows Firewall on client computers.

It’s also the easiest way to add port exceptions for services such as HTTP, file sharing, software applications, and more. However, it’s also good to know how to configure the Windows Firewall from the command prompt just in case you have computers and servers not in Active Directory.

First, to see whether the Windows Firewall is enabled on a server or computer, type this command at the command prompt:

netsh firewall show opmode

You should get something similar to what is below:

Depending on how many network adapters you have installed on your computer, you’ll see three or more listings. Operational Mode means if the Firewall is turned on or off. Exception mode is if exceptions are allowed or not. Enable means on.

To enable the Firewall in Windows, simply run this command:

netsh firewall set opmode enable

Pretty simply eh? Now what if you want to add a port exception (open a port) to the Firewall using the command line? That’s simple too!

Let’s say you wan to open port 3389, which is for remote desktop in Windows. You would simply run this command:

netsh firewall add portopening TCP 3389 RDP enable subnet

The way the command works is by using the netsh firewall add portopening command, following by the protocol (TCP, UDP), followed by the actual port number, followed by a name (anything you want) and then the enable subnet command.

If you were to run this command then go view the exceptions in Windows Firewall, you would see that the item is now checked:

Add To Google BookmarksStumble ThisFav This With TechnoratiAdd To Del.icio.usDigg ThisAdd To RedditTwit ThisAdd To FacebookAdd To Yahoo

How to change your network card MAC address

Just recently I visited a friend whose ISP used the MAC address of his LAN card to authenticate his connection. Since we know that the MAC address is an important element of LAN and WAN identification, some ISPs use it for monitoring or authenticating their clients before they can gain access to the Internet.

Unforunately, my friends LAN card failed due to some hardware issues. So we went to a local computer store and bought him a new one, but since it has a different MAC address than the old one, we were not able to connect to the Internet.

We called up the ISP support but they said that the resolution could take 2 to 3 days. It was unacceptable so we decided to take the matter into our own hands. We knew that it was only a matter of cloning the old MAC address for the LAN card to be properly authenticated.

I ended up downloading a free software called Technitium MAC Address Changer. (see http://www.technitium.com/) Currently at version 5, it allows users to change Media Access Control (MAC) Address of your Network Interface Card (NIC) or Wireless Network Card (WiFi), irrespective of the NIC’s drivers or its manufacturer.

Installing the 3MB software was a breeze and the main window is easy to grasp too even for a first time user.

The upper portion lists all network interfaces with active connections having a MAC address. To change the MAC address, just click the Change MAC button. Enter the new MAC address then make sure to check the options to automatically restart network connection and make new MAC address persistant [SIC, should be “persistent”].

Click the Change Now button to apply the changes. You should see the change when you do an IPCONFIG /ALL at the DOS command prompt.

Now that you know how to change your MAC address, you may use it to your advantage like cloning a MAC address so that you can connect multiple computers to the Internet.

Add To Google BookmarksStumble ThisFav This With TechnoratiAdd To Del.icio.usDigg ThisAdd To RedditTwit ThisAdd To FacebookAdd To Yahoo

What is The Difference between Windows 32-bit and 64-bit?

What’s 32-bit?

In computer architecture, 32-bit integers, memory addresses, or other data units are those that are at most 32 bits (4 octets) wide. Also, 32-bit CPU and ALU architectures are those that are based on registers, address buses, or data buses of that size. 32-bit is also a term given to a generation of computers in which 32-bit processors were the norm.

The range of integer values that can be stored in 32 bits is 0 through 4,294,967,295 or ˆ’2,147,483,648 through 2,147,483,647 using two’s complement encoding. Hence, a processor with 32-bit memory addresses can directly access 4 GB of byte-addressable memory.

Did everyone get that? Good! Now let’s see what 64-bit is:

In computer architecture, 64-bit integers, memory addresses, or other data units are those that are at most 64 bits (8 octets) wide. Also, 64-bit CPU and ALU architectures are those that are based on registers, address buses, or data buses of that size.

Now that we have the differences between 32-bit and 64-bit technologies on the table let’s discuss in grandpa’s language how they differ. The biggest difference between the two is memory addressing: hence that 32-bit only can directly access memory up to 4 GB, while 64-bits can address memory up to 1000GB or 1 terabyte.

On the 64-bit processor the channel (Bus) is wider than the 32-bit processor, that’s why the 64-bit processor can process double the amount of data than the 32-bit processor. When comparing the 32-bit and 64-bit processor think about a highway, one with 32 lanes and the other with 64 lanes, which highway do you think will transport more passengers to their destination faster? oh well.

Most processors from AMD and Intel made in the last year support 64 bit processing, and if you have purchased a 32-bit windows XP or Vista operating system you can order the 64-bit medium from Microsoft and pay only the shipping cost. order it here

Check your hardware to make sure its compatible with 64-bit Operating System before making any attempt to upgrade. Also keep in mind that not all devices have 64-bit drivers available, so not all devices will work under 64 bit architecture. Another thing, all drives running on a 64 bit OS need to be certified by Microsoft, so, a driver will not work unless it has been blessed by the high priest Microsoft.

Add To Google BookmarksStumble ThisFav This With TechnoratiAdd To Del.icio.usDigg ThisAdd To RedditTwit ThisAdd To FacebookAdd To Yahoo

Friday, October 9, 2009

99 ways to make your computer blazingly fast

Over the last several years working in IT for various companies as a Systems Administrator, Network Administrator, and Help Desk professional, I’ve written and learned about many ways to increase the performance of not only my PC, but also of the many PCs on my networks ranging from Windows 98 to Windows Vista.

In this article, I hope to compile a complete list of all the different methods and tricks that I’ve used to get the last bit of juice out of a slow PC. Whether you are using an old PC or the latest and greatest in hardware, you can still use some of these to make your PC run faster.

Note that since I write two blogs, Help Desk Geek and Online Tech Tips, I have previously written about many performance tips already which I will link back to throughout. If I have not written about it, I’ve throw in a link to a relevant article from some of my other favorite sites. This list is in no particular order, just written in the order that I could think of them.

There are probably a lot of great tweaks and performance hacks that I’ve missed here, so feel free to chime in with comments! Enjoy!

1. Defragment your computer hard disk using free tools like SmartDefrag.

2. You should also defragment your Windows pagefile and registry.

3. Clean up hard drive disk space being taken up by temporary files, the recycle bin, hibernation and more. You can also use a tool like TreeSize to determine what is taking up space on your hard drive.

4. Load up Windows faster by using Startup Delayer, a free program that will speed up the boot time of Windows by delaying the startup of programs.

5. Speaking of startup programs, many of them are useless and can be turned off. Use the MSCONFIG utility to disable startup programs.

6. By default, the size of the paging file is controlled by Windows, which can cause defragmentation. Also, the paging file should be on a different hard drive or partition than the boot partition. Read here on the rules for best paging file performance.

7. In Windows XP and Vista, the Windows Search indexing service is turned on for all local hard drives. Turning off indexing is a simple way to increase performance.

8. If you don’t care about all the fancy visual effects in Windows, you can turn them off by going to Performance Options.

9. You can optimize the Windows boot time using a free program called Bootvis from Microsoft.

10. Clean your registry by removing broken shortcuts, missing shared DLLs, invalid paths, invalid installer references and more. Read about the 10 best and free registry cleaners.

11. One of the main reasons why PC’s are slow is because of spyware. There are many programs to remove spyware including Ad-Aware, Giant Antispyware, SUPERAntiSpyware, and more.

12. If you have a deeper spyware infection that is very hard to remove, you can use HijackThis to remove spyware.

13. Remove unwanted pre-installed software (aka junk software) from your new PC using PC Decrapifier.

14. Disable unnecessary Windows services, settings, and programs that slow down your computer.

15. Tweak Windows XP and tweak Windows Vista settings using free programs

16. Disable UAC (User Account Control) in Windows Vista

17. Tweak your mouse settings so that you can copy and paste faster, scroll faster, navigate quickly while browsing and more. Read here to learn how to tweak your mouse.

18. Delete temporary and unused files on your computer using a free program like CCleaner. It can also fix issues with your registry.

19. Delete your Internet browsing history, temporary Internet files, cookies to free up disk space.

20. Clean out the Windows prefetch folder to improve performance.

21. Disable the XP boot logo to speed up Windows boot time.

22. Reduce the number of fonts that your computer has to load up on startup.

23. Force Windows to unload DLLs from memory to free up RAM.

24. Run DOS programs in separate memory spaces for better performance.

25. Turn off system restore only if you regularly backup your Windows machine using third party software.

26. Move or change the location of your My Documents folder so that it is on a separate partition or hard drive.

27. Turn off default disk performance monitors on Windows XP to increase performance.

28. Speed up boot time by disabling unused ports on your Windows machine.

29. Use Process Lasso to speed up your computer by allowing it to make sure that no one process can completely overtake the CPU.

30. Make icons appear faster while browsing in My Computer by disabling search for network files and printers.

31. Speed up browsing of pictures and videos in Windows Vista by disabling the Vista thumbnails cache.

32. Edit the right-click context menu in Windows XP and Vista and remove unnecessary items to increase display speed.

33. Use the Windows Performance Toolkit and the trace logs to speed up Windows boot time.

34. Speed up your Internet browsing by using an external DNS server such as OpenDNS.

35. Improve Vista performance by using ReadyBoost, a new feature whereby Vista can use the free space on your USB drive as a caching mechanism.

36. If you have a slow Internet connection, you can browse web pages faster using a service called Finch, which converts it into simple text.

37. Use Vista Services Optimizer to disable unnecessary services in Vista safely.

38. Also, check out my list of web accelerators, which are programs that try to prefetch and cache the sites you are going to visit.

39. Speed up Mozilla Firefox by tweaking the configuration settings and by installing an add-on called FasterFox.

40. Learn how to build your own computer with the fastest parts and best hardware.

41. Use a program called TeraCopy to speed up file copying in Windows XP and Vista.

42. Disable automatic Last Access Timestamp to speed up Windows XP.

43. Speed up the Start Menu in Vista by hacking the MenuShowDelay key in the registry.

44. Increase the FileSystem memory cache in Vista to utilize a system with a large amount of RAM.

45. Install more RAM if you are running XP with less than 512 MB or Vista with less than 1 GB of RAM.

46. Shut down XP faster by reducing the wait time to kill hung applications.

47. Make sure that you have selected “Adjust for best performance” on the Performance tab in System Properties.

48. If you are reinstalling Windows, make sure that you partition your hard drives correctly to maximize performance.

49. Use Altiris software virtualization to install all of your programs into a virtual layer that does not affect the registry or system files.

50. Create and install virtual machines for free and install junk program, games, etc into the virtual machines instead of the host operating system. Check out Sun openxVM.

51. Do not clear your paging file during shutdown unless it is needed for security purposes. Clearing the paging file slows down shutdown.

52. If your XP or Vista computer is not using NFTS, make sure you convert your FAT disk to the NTFS file system.

53. Update all of your drivers in Windows, including chipset and motherboard drivers to their latest versions.

54. Every once in a while run the built-in Windows Disk Cleanup utility.

55. Enable DMA mode in Windows XP for IDE ATA/ATAPI Controllers in Device Manager.

56. Remove unnecessary or old programs from the Add/Remove dialog of the Control Panel.

57. Use a program click memtest86 or Prime95 to check for bad memory on your PC.

58. Determine your BIOS version and check the manufactures website to see if you need to update your BIOS.

59. Every once in a while, clean your mouse, keyboard and computer fans of dust and other buildup.

60. Replace a slow hard drive with a faster 7200 RPM drive, SATA drive, or SAS drive.

61. Changing from Master/Slave to Cable Select on your hard drive configuration can significantly decrease your boot time.

62. Perform a virus scan on your computer regularly. If you don’t want to install virus protection, use some of the free online virus scanners.

63. Remove extra toolbars from your Windows taskbar and from your Internet browser.

64. Disable the Windows Vista Sidebar if you’re not really using it for anything important. All those gadgets take up memory and processing power.

65. If you have a SATA drive and you’re running Windows Vista, you can speed up your PC by enabling the advanced write caching features.

66. Learn how to use keyboard shortcuts for Windows, Microsoft Word, Outlook, or create your own keyboard shortcuts.

67. Turn off the Aero visual effects in Windows Vista to increase computer performance.

68. If you are technically savvy and don’t mind taking a few risks, you can try to overclock your processor.

69. Speed up the Send To menu in Explorer by typing “sendto” in the Run dialog box and deleting unnecessary items.

70. Make sure to download all the latest Windows Updates, Service Packs, and hot fixes as they “normally” help your computer work better.

71. Make sure that there are no bad sectors or other errors on your hard drive by using the ScanDisk orchkdsk utility.

72. If you are not using some of the hardware on your computer, i.e. floppy drive, CD-ROM drive, USB ports, IR ports, Firewire, etc, then go into your BIOS and disable them so that they do not use any power and do not have to be loaded during boot up.

73. If you have never used the Recent Documents feature in Windows, then disable it completely as a long list can affect PC performance.

74. One basic tweak that can help in performance is to disable error reporting in Windows XP

75. If you don’t care about a pretty interface, you should use the Windows Classic theme under Display Properties.

76. Disable short filenames if you are using NTFS by running the following command: fsutil behavior set disable8dot3 1. It will speed up the file creation process.

77. If you have lots of files in a single folder, it can slow down Explorer. It’s best to create multiple folders and spread out the files between the folders.

78. If you have files that are generally large, you might want to consider increasing the cluster size on NTFS to 16K or even 32K instead of 4K. This will help speed up opening of files.

79. If you have more than one disk in your PC, you can increase performance by moving your paging file to the second drive and formatting the volume using FAT32 instead of NTFS.

80. Turn off unnecessary features in Vista by going to Control Panel, choosing Uninstall a program, and then clicking on Turn Windows features on and off. You can turn off Remote Differential Compression, Tablet PC components, DFS replication service, Windows Fax & Scan, Windows Meeting Space, and lots more.

81. Install a free or commercial anti-virus program to help protect against viruses, etc. Make sure to use an anti-virus program that does not hog up all of your computer resources.

82. Completely uninstall programs and applications using a program like Revo Uninstaller. It will get rid of remnants left behind by normal uninstalls.

83. If you know what you are doing, you can install several hard drives into your machine and set them up in RAID 0, RAID 5, or other RAID configurations.

84. If you are using USB 1.0 ports, upgrade to 2.0. If you have a Firewire port, try to use that instead of a USB port since Firewire is faster than USB right now.

85. Remove the drivers for all old devices that may be hidden in Device Manager that you no longer use.

86. A more extreme option is to choose a faster operating system. If you find Vista to be slow, go with Windows XP. Switching to Mac or Linux is also an option.

87. One of the easiest ways to speed up your PC is to simply reformat it. Of course, you want to backup your data, but it is the best way to get your computer back to peak performance.

88. Speed up Internet browsing in IE by increasing the number of max connections per server in the registry.

89. If you use uTorrent to download torrents, you can increase the download speeds by tweaking the settings.

90. If you have a desktop background, make sure it’s a small and simple bitmap image rather than a fancy picture off the Internet. The best is to find a really small texture and to tile it.

91. For the Virtual Memory setting in Windows (right-click on My Computer, Properties, Advanced, Performance Settings, Advanced, Virtual Memory), make sure the MIN and MAX are both the same number.

92. If you search on Google a lot or Wikipedia, you can do it much faster on Vista by adding them to the Vista Start Menu Instant Search box.

93. If you have a custom built computer or a PC that was previously used, make sure to check the BIOS for optimal settings such as enabled CPU caches, correctly set IDE/SATA data transfer modes, memory timings, etc. You can also enable Fast/Quick boot if you have that option.

94. If you have a SCSI drive, make sure the write cache is enabled. You can do so by opening the properties of the SCSI drive in Windows.

95. If you have a machine with an older network card, make sure to enable the onboard processor for the network card, which will offload tasks from the CPU.

96. If you are using Windows Vista, you can disable the Welcome Center splash screen that always pops up.

97. If you already have anti-spyware software installed, turn off Windows Defender protection.

98. If you are running a 32-bit version of Windows and have 4GB of RAM or more, you can force Windows to see and use all of the RAM by enabling PAE.

99. Buy a new computer!!! Pretty easy eh?

Add To Google BookmarksStumble ThisFav This With TechnoratiAdd To Del.icio.usDigg ThisAdd To RedditTwit ThisAdd To FacebookAdd To Yahoo

Monday, October 5, 2009

All you wanted to know about 'hair fall'

What is the difference between hair loss and balding ?

Hair loss, also known as alopecia, is a term used for progressive hair thinning and alopecia areata, which is spot baldness or loss of hair from certain areas of the scalp, also known as patchy baldness. Baldness, also known as androgenic alopecia, on the other hand, is a condition wherein a person loses hair on scalp in a typical sequence and pattern. There is male pattern baldness as well as female pattern baldness. Hair loss usually starts at the temples and/or on the crown of the head. Thinning of hair over a number of years may lead to total baldness.


Do men bald more than women?

Baldness affects both men and women, though it is much more prevalent in men. By the age of 25, 25 per cent of men have lost some of their hair. The reason behind this could be attributed to a chemical called Dihydrotestosterone, or DHT, which builds up around the hair follicle and eventually kills both the follicle and the hair.
While women don’t necessarily lose all of their hair like men, they often get thinning hair. It could be due to hormonal imbalances, but can also be a result of pregnancy, lack of nutrients in the body, or even certain birth control and hormone medications.


What are the main causes of baldness?

There are many causes for baldness - alopecia areata, syphilis, traction alopecia, seborrhoeic dermatitis, post-febrile condition, debility and emaciation, during lactation, endocrine disorders, stress and strains, certain drugs like hydration, etc, hereditary factors, injury, burns, leprosy and X-rays burns, etc.

Add To Google BookmarksStumble ThisFav This With TechnoratiAdd To Del.icio.usDigg ThisAdd To RedditTwit ThisAdd To FacebookAdd To Yahoo

Sunday, October 4, 2009

An interesting fact about August 2009

This august had 5 Saturdays, 5 Sundays, and 5 Mondays.

All these days were in single month – August 2009. If we look the last events, similar condition was happened in 1998, 1992, 1987, 1981 and so on. Hence it seems that it is not a scheduled event and not common too.

When February get 29 days in a month, we call it leap year and that comes every four year. But what is it call When we get a situation occurring once in more than 5 years?

"Mosasu-5 year"!

Mosasu is for Monday, Saturday, and Sunday with 5 days (Taking two initial letters of each day).

Add To Google BookmarksStumble ThisFav This With TechnoratiAdd To Del.icio.usDigg ThisAdd To RedditTwit ThisAdd To FacebookAdd To Yahoo

Saturday, October 3, 2009

How to add music to PowerPoint

One common question I get is how to add music to a PowerPoint presentation? Add a music track to a PowerPoint presentation can really help make the presentation more interesting. It’s especially useful for creating presentations for friends or family.

In this article, I will explain how you can add music to PowerPoint 2007 presentation. The process is fairly straightforward and there are just a couple of options you can configure.

Note that in PowerPoint 2007, you can also record sound for each slide and therefore create a audio and visual presentation if you like where everything is synced nicely.

How to add music to PowerPoint

First, click on the Insert tab on the Office Ribbon and then click on the Sound button to the far right.

You’ll now see a few options from the drop down: Sound from file, Sound from Clip Organizer, Play CD Audio track, and Record Sound.

If you already have an audio file that you want to insert into your presentation, then choose Sound from File. PowerPoint 2007 supports number audio file formats including AIF, AU, MID, RMI, MP3, WAV, and WMA.

Choose Sound from Clip Organizer if you want to search Microsoft Online collections for free sounds. Just type in a search term and you’ll get a list of sounds that you can insert into each slide.

If you have a CD with music tracks on it, you can actually have PowerPoint play the CD during your presentation. Remember, though, that if you use this option, you need to make sure that the CD is inserted into the drive on whichever computer is playing the presentation.

You can tell it which track to start on and which track to stop on. You can also continuously loop the music if you like. Pretty neat feature if you have a CD from a store and you only want to play a specific part of it.

Finally, you can record audio into your presentation if you have a microphone attached to your computer. I would suggest making one recording for each slide that you want audio on because when you play the presentation, each slide can play it’s own audio files.

Once you have inserted audio into the presentation using any of these methods, you’ll see a small little audio icon in the slide. Click on that and you be able to see a Sound Tools tab at the very top.

The Sound Tools bar allows you to configure the settings for the sound that you just inserted.

You can preview the sound by clicking on the green button at the far left. You can adjust the volume of the sound to Low, Medium, High, or Mute.

The Hide During Show checkbox will hide the audio icon that is currently in the slide. By default, that audio icon will show up, so check this box if you want to hide it.

The Loop Until Stopped box will continuously play the audio file you specified until the PowerPoint presentation is over.

Play Sound has several options: Automatically, When Clicked, and Play Across Slides. By default, automatically is selected and will play when the slideshow starts and will end once you move to the next slide. When Clicked will only play it once you press the mouse button. Play Across Slides will allow the sound to continue to play to the next slide if it has not finished rather than cutting it off.

Finally, you can also specify the max file size for the audio file. I’m not 100% sure what exactly that does, but I am guessing it tries to compress the sound to fit that size.

That’s it! It’s pretty simple to add music and sounds to PowerPoint 2007, making your presentations more fun to watch! Enjoy!

Add To Google BookmarksStumble ThisFav This With TechnoratiAdd To Del.icio.usDigg ThisAdd To RedditTwit ThisAdd To FacebookAdd To Yahoo

How to capture, save, record or download streaming audio for free

Ever wonder how you could possibly record or rip a song that’s being streamed across the Internet onto your computer for free? Trying to download streaming audio directly to your computer can be quite difficult because different sites have different security measures put in place, so one program might work for one site, but not another.

However, one surefire way of recording streaming audio from any web site is to simply capture it via the sound card on your computer. Basically, there are programs that can record whatever is being played by your computer’s speakers, so if you can hear it, it can be recorded. Of course, you’ll have to listen to the entire song since the recording is live, but it’s definitely much easier than trying to download the file from the web site directly.

There are two programs that I use to capture and save streaming audio: one installs as a toolbar into Internet Explorer or FireFox and the other one is a standalone program.

If you don’t mind having another toolbar installed in your browser window, FreeCorder (http://freecorder.com/sound-recorder/)is a very convenient program to use if you’re going to be recording music that’s mostly played via the web, such as Internet radio, etc. Also, it has many other features that make it quite useful, such as the ability to extract audio from videos and record from your PC’s microphone or line-in port. It also supports Windows Vista and has absolutely no spyware or adware, so you don’t have to worry about pop-ups, etc. You can save the recordings out as MP3 or as WAV files.

Once you have it installed, click on the Settings button to configure the source for the sounds or music.

By default, the “Record From Freecorder Audio Driver” is selected and this will record anything that is being played through your speakers. If you have a Windows input device, such as a microphone, you can select the second or third option. However, remember to de-select the other options and only have one checkbox checked at a time, otherwise it creates a separate file for each source.

You can also change the output format to WAV, prompt for a filename or automatically timestamp it, and choose the location for the destination files. Now start playing some music on your computer and press the red Record button. A little box will pop up and you should see the green line moving up and down. The nice thing about this program is that you can have your laptop sound on Mute or have your speakers turned off and it will still record whatever is being played.

Click Stop when you’re finished and then click Play to view your recordings. And that’s it! A pretty easy and cool way to record any sound or music off the Internet or from your computer.

If you don’t like the idea of cluttering up your browser toolbar, you can use a standalone program called MP3MyMP3 Recorder,(http://www.mp3mymp3.com/mp3_my_mp3_recorder.html) which is also free. Like FreeCorder, this program also records whatever is being played by your computer’s speakers. However, unlike FreeCorder, this program requires that your sound NOT be muted. So if you want to record anything, it has to be playing and you have to be able to hear it yourself.

Also, by default, MP3MyMP3 tries to record from your microphone and not your sound card, so click on the Source button and choose Stereo Mix as the sound source. The recording quality for both of the products was very good and sounded just like the originals from what I could tell. Personally, I like FreeCorder better, but MP3MyMP3 is also a fine alternative.

Any questions or problems, please post a comment!

Add To Google BookmarksStumble ThisFav This With TechnoratiAdd To Del.icio.usDigg ThisAdd To RedditTwit ThisAdd To FacebookAdd To Yahoo