Monday, May 31, 2010

X-Mouse Button Control : Use Extra Mouse Buttons to Increase Efficiency

Did you know that the most commonly used mouse actions are clicking a window’s “Close” button (the X in the top-right corner), and clicking the “Back” button (in a browser and various other programs)? How much time do you spend every day locating the Close button or the Back button with your mouse so that you can click on them? And what about that mouse you’re using – how many buttons does it have, besides the two main ones? Most mouses these days have at least four (including the scroll-wheel, which a lot of people don’t realize is also a button as well). Why not assign those extra buttons to your most common mouse actions, and save yourself a bundle of mousing-around time every day?
 
If your mouse was manufactured by one of the “premium” mouse manufacturers (Microsoft, Logitech, etc), it almost certain came with driver software to allow you to customize your mouse’s controls and take advantage of your mouse’s special features. Microsoft, for example, provides driver software called IntelliPoint, while Logitech provides SetPoint. It’s possible that your mouse has some extra buttons but doesn’t come with its own driver software (the author is using a Microsoft Bluetooth Notebook Mouse 5000, which amazingly is not supported by the Microsoft IntelliPoint software!). If your mouse falls into this category, you can use a marvelous free product called X-Mouse Button Control, from Highresolution Enterprises. It provides a truly amazing array of mouse configuration options, including assigning actions to buttons on a per-application basis.
 
Once X-Mouse Button Control is downloaded, its setup process is quite straightforward.
Once downloaded, you can start the program via Start / Highresolution Enterprises / X-Mouse Button Control. You will find the program’s icon in the system tray:
Right-click on the icon and select Setup from the pop-up menu. The program’s configuration window appears:
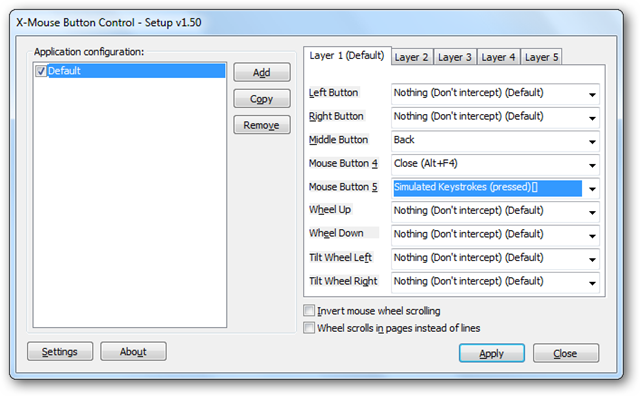
It’s extremely unlikely that we will want to change the functionality of our mouse’s two main buttons (left and right), so instead we’ll look at the rest of the options on the right side of the window. The Middle Button refers to either the third, middle button (found on some old mouses), or the pressing of the wheel itself, as a button (if you didn’t know you could press your wheel like a button, try it out now). Mouse Button 4 and Mouse Button 5 usually refer to the extra buttons found on the side of the mouse, often near your thumb.
 
So what can we use these extra mouse buttons for? Well, clearly Close and Back are two obvious candidates. Each of these can be found by selecting them from the drop-down menu next to each button field:
 Once the two options are chosen, the window will look something like this:
If you’re not interested in choosing Back or Close, you may like to try some of the other options in the list, including:
  • Cut, Copy and Paste
  • Undo
  • Show the Desktop
  • Next/Previous track (for media playback)
  • Open any program
  • Simulate any keystroke or combination of keystrokes
  • ….and many other options. Explore the drop-down list to see them all.
You may decide, for example, that closing the current document (as opposed to the current program) would be a good use for Mouse Button 5. In other words, we need to simulate the keypress of Ctrl-F4. Let’s see how we achieve this.
 
First we select Simulated Keystrokes from the drop-down list:
The Simulated Keystrokes window opens:
The instructions on the page are pretty comprehensive. If you want to simulate the Ctrl-F4 keystroke, you need to type {CTRL}{F4} into the box:
 …and then click OK.

Assigning Actions to Buttons on a Per-Application Basis
One of the most powerful features of X-Mouse Button Control is the ability to assign actions to buttons on a per-application basis. This means that if we have a particular program open, then our mouse will behave differently – our buttons will do different things.
 
For example, when we have Windows Media Player open, for example, we may wish to have buttons assigned to Play/Pause, Next track and Previous track, as well as changing the volume with the mouse! This is easy with X-Mouse Button Control. We start by opening Windows Media Player. This makes the next step easier. Then we return to X-Mouse Button Control and add a new “configuration”. This is done by clicking the Add button:
A window opens containing a list of all running programs, including our recently opened Windows Media Player:
We select Windows Media Player and click OK. A new, blank “configuration” is created:
 
We repeat the earlier steps to assign buttons to Play/Pause, Next track and Previous track, and assign scrolling the wheel to alter the volume:
To save all our changes and close the window, we click Apply.
 
Now spend a few minutes thinking of all the applications you use the most, and what are the most common simple tasks you perform in each of those applications. Those tasks are then perfect candidates for per-application button assignments.
 
There are many more configuration options and capabilities of X-Mouse Button Control – too many to list here. We encourage you to spend a bit of time exploring the Setup window. Then, most important of all, don’t forget to use your new mouse buttons! Get into the habit of using them, and then after a while you’ll start to wonder how you ever tolerated the laborious, tedious, time-consuming process of actually locating each window’s Close button…
 
 
Hey! My friends, If you like my post you can save it using "Save Page as PDF" button below and you can even share them to your friends with social networking buttons provided below this post.

Add To Google BookmarksStumble ThisFav This With TechnoratiAdd To Del.icio.usDigg ThisAdd To RedditTwit ThisAdd To FacebookAdd To Yahoo

Sunday, May 30, 2010

How To Change The Default Font Size In MS Word 2007 & 2010?

Are you frustrated by always having to change the font size before you create a document it Word? Here’s how you can end that frustration and set your favorite default font size for once and for all!

Microsoft changed the default font font to 11 point Calibri in Word 2007 after years of 12 point Times New Roman being the default. Although it can be easily overlooked, there are ways in Word to change the default settings to anything you want. Whether you want to change your default to 12 point Calibri or to 48 point Comic Sans…here’s how to change your default font settings in Word 2007 and 2010.

Changing Default Fonts in Word
To change the default font settings, click the small box with an arrow in the right left corner of the Font section of the Home tab in the Ribbon.
In the Font dialog box, choose the default font settings you want. Notice in the Font box it says “+Body”; this means that the font will be chosen by the document style you choose, and you are only selecting the default font style and size. So, if your style uses Calibri, then your font will be Calibri at the size and style you chose. If you’d prefer to choose a specific font to be the default, just select one from the drop-down box and this selection will override the font selection in your document style.

Here we left all the default settings, except we selected 12 point font in the Latin text box (this is your standard body text; users of Asian languages such as Chinese may see a box for Asian languages). When you’ve made your selections, click the “Set as Default” button in the bottom left corner of the dialog.
You will be asked to confirm that you want these settings to be made default. In Word 2010, you will be given the option to set these settings for this document only or for all documents. Click the bullet beside “All documents based on the Normal.dotm template?”, and then click Ok.
In Word 2007, simply click Ok to save these settings as default.
Now, whenever you open Word or create a new document, your default font settings should be set exactly to what you want. And simply repeat these steps to change your default font settings again if you want.

Editing your default template file
Another way to change your default font settings is to edit your Normal.dotm file. This file is what Word uses to create new documents; it basically copies the formatting in this document each time you make a new document.

To edit your Normal.dotm file, enter the following in the address bar in Explorer or in the Run prompt:

%appdata%\Microsoft\Templates

This will open your Office Templates folder. Right-click on the Normal.dotm file, and click Open to edit it. Note: Do not double-click on the file, as this will only create a new document based on Normal.dotm and any edits you make will not be saved in this file.
Now, change any font settings as you normally would. Remember: anything you change or enter in this document will appear in any new document you create using Word.
If you want to revert to your default settings, simply delete your Normal.dotm file. Word will recreate it with the standard default settings the next time you open Word.
Note: Changing your default font size will not change the font size in existing documents, so these will still show the settings you used when these documents were created. Also, some addins can affect your Normal.dotm template. If Word does not seem to remember your font settings, try disabling Word addins to see if this helps.

Hey! My friends, If you like my post you can save it using "Save Page as PDF" button below and you can even share them to your friends with social networking buttons provided below this post.

Add To Google BookmarksStumble ThisFav This With TechnoratiAdd To Del.icio.usDigg ThisAdd To RedditTwit ThisAdd To FacebookAdd To Yahoo

Saturday, May 29, 2010

Desktop Info : A Tool To Display System Information On Your Desktop

Desktop Info comes in a zip file format so you will need to unzip the app, place it into an appropriate “Program Files Folder”, and create a shortcut. Do NOT delete the “Read Me File”…this will be extremely useful to you when you make changes to the “Configuration File”. Once you have everything set up you are ready to start Desktop Info up.

This is the default layout and set of listings displayed when you start Desktop Info up for the first time. The font colors will be a mix of colors as seen here and the font size will perhaps be a bit small but those are very easy to change if desired.

You can access the “Context Menu” directly over the “information area”…so no need to look for it in the “System Tray”. Notice that you can easily access that important “Read Me File” from here:

The full contents of the configuration file (.ini file) are displayed here so that you can see exactly what kind of information can be displayed using the default listings. The first section is “Options”…you will most likely want to increase the font size while you are here.

Then “Items”… If you are unhappy with any of the font colors in the “information area” this is where you can make the changes. You can turn information display items on or off here.

And finally “Files, Registry, & Event Logs”.

Here is our displayed information after a few tweaks in the configuration file.

If you have been looking for a system information app that is simple and easy to set up then you should definitely give Desktop Info a try.

Download Desktop Info

Hey! My friends, If you like my post you can save it using "Save Page as PDF" button below and you can even share them to your friends with social networking buttons provided below this post.

Add To Google BookmarksStumble ThisFav This With TechnoratiAdd To Del.icio.usDigg ThisAdd To RedditTwit ThisAdd To FacebookAdd To Yahoo

Friday, May 28, 2010

Tempo : A Tool To Schedule shutdown, Standby, Hibernation of Windows PC


Ideally, we goto start and then click to shutdown (or logoff, standby, hibernate) Windows computer. Do you want to schedule and automatically turn off computer without having to click any button on Windows? There are number of utilities that allow scheduling of automatic shutdown, standby and hibernation of PC.


Tempo is a very neat and easy to use utility for scheduling shutdown, standby and hibernation on Windows. You can select date – time and action among shutdown, hibernate, turnoff. Just click Schedule button and you are all set for automatic shutdown routine.

You can click clear button to remove any previous scheduling for PC shutdown, standby and hibernation. Also, click countdown button for teaser countdown before the actual shutdown.

Download Tempo

Hey! My friends, If you like my post you can save it using "Save Page as PDF" button below and you can even share them to your friends with social networking buttons provided below this post.

Add To Google BookmarksStumble ThisFav This With TechnoratiAdd To Del.icio.usDigg ThisAdd To RedditTwit ThisAdd To FacebookAdd To Yahoo

Thursday, May 27, 2010

Time Stopper :

The software that we often download are mostly shareware that is they are just for the trial purpose and will get expire after some time but now you can use your trial software any no. of times. To be able to use the free version of the software you need to download the tool called Time Stopper which can stop the time for trial version software.


Time Stopper is a tiny utility which eliminate the time limit existing into trial software usage period.

Time Stopper works with any software executable file and practically will extend the trial period of the program for an unlimited amount of time.


Time Stopper is very easy to install and use: you just have to browse for the executable file of trial program (generally located in C:Program Files) and select the new installation date. Now, your program trial period will be automatically extended to another 30 / 90 days, depending on the software.

TimeStopper will not modify the time and date of the operating system, therefore is safe to use.

Download Time Stopper

Hey! My friends, If you like my post you can save it using "Save Page as PDF" button below and you can even share them to your friends with social networking buttons provided below this post.

Add To Google BookmarksStumble ThisFav This With TechnoratiAdd To Del.icio.usDigg ThisAdd To RedditTwit ThisAdd To FacebookAdd To Yahoo

Wednesday, May 26, 2010

IsMyLcdOK : A Tool To Test & Check The Dead Pixels On The Screen

IsMyLcdOK is a small program but effective solution to easily check for dead/paralysed/stuck pixels on LCD monitors.

Many manufacturer's provide the highest industry standard dead pixel policy. IsMyLcdOK does not have to be installed and can be executed easily from the desktop, and can be carried on a small usb-stick or other memory device.

So, Test your LCD monitor for dead or stuck pixels with simple freeware application IsMyLcdOK. There's not much to the program: Just run it and then walk through the battery of onscreen tests designed to isolate dead or stuck pixels.


Chances are you may already have an idea where you monitor's pixels have gone awry, but with IsMyLcdOK you can be sure to spot any bad pixel. Once you've done that, take a look at our previous guides to fixing dead pixels, repairing stuck pixels, or removing LCD image burn-in. IsMyLcdOK is freeware, Windows only.

Download IsMyLcdOK

Hey! My friends, If you like my post you can save it using "Save Page as PDF" button below and you can even share them to your friends with social networking buttons provided below this post.

Add To Google BookmarksStumble ThisFav This With TechnoratiAdd To Del.icio.usDigg ThisAdd To RedditTwit ThisAdd To FacebookAdd To Yahoo

Tuesday, May 25, 2010

Revo Uninstaller : Uninstall a program that is difficult to uninstall.


The uninstall of software is a big matter. I have seen users delete program shortcuts on their desktop, thinking they just removed the program. Removing the shortcut icon to the program on your desktop will not remove the program.

Uninstalling is like reverse engineering and it is a whole other process in itself. The problem with the uninstall process is that it is not as systematic, orderly and precise as the install process. In Windows your options to uninstall, is either an “uninstaller” provided by the software maker (usually located on the Start Menu with the program) or by using the “Add/Remove” component (in Windows XP) or “Uninstall or Change a Program” component (in Vista, which is under “Programs and Features). Both of these components can be reached by using the Windows “Control Panel”.

These options are about 90 percent on target with the uninstall process; however, they leave traces of the program behind (such as the program folders, user folders, writes to the registry, stray files, autorun entries, etc.). Most users do not know where or how to look for the debris left behind. Installing and Uninstalling software can have a cumulative negative effect on the overall operation of your computer. This is one of the reasons I personally will look for and use portable software options, when available, to eliminate this shotgun effect.

To assist users with uninstalling software on their computer, a program that I have had good results with is a program, which is “FREE”, called Revo Uninstaller.


Revo Uninstaller (Windows) is a free (and paid) application that makes an extra effort to make sure you have a clean uninstall of a program. It scans your computer for remaining bits and pieces of the uninstalled software after the standard uninstaller does its job and makes sure the program has been completely removed. In addition it includes a few other tools meant to clean your hard disk of unwanted files from previous installations and otherwise.

Checkout Revo Uninstaller.

Hey! My friends, If you like my post you can save it using "Save Page as PDF" button below and you can even share them to your friends with social networking buttons provided below this post.

Add To Google BookmarksStumble ThisFav This With TechnoratiAdd To Del.icio.usDigg ThisAdd To RedditTwit ThisAdd To FacebookAdd To Yahoo

Monday, May 24, 2010

Three Tools To Speed Up & Optimize Windows Startup

Everyone wants a system that boots in as less time as possible. Some people do not shutdown their systems just because it takes a long time to start up again. Here I’ll discuss 3 utilities for analyzing the Windows startup. After analyzing, you will be able to see which file or program is actually taking how much time during Windows startup and you can disable the items that take longer during startup.

BootVis:

BootVis is a very old utility by Microsoft which was specifically designed for analyzing Windows XP startup.While it’s free, the only disadvantage is that it is only compatible with Windows XP. No Windows Vista or Windows 7 support is available as Microsoft has abandoned this utility. But still it’s worth having if you’re using Windows XP.

Download BootVis

WinBootInfo:

WinBootInfo is the advanced Windows Boot Analyzer that logs drivers and applications loaded during system boot, measures Windows boot times, records CPU and I/O activity during the boot, and much more!

It’s features include:
- Windows Boot Time Logging
- Detailed information about loaded drivers, applications and system DLLs
- Each loaded system component is displayed on the detailed time map
- Tree-View of Loaded Processes sorted in time
- Different times logged (boot to Login Prompt, Explorer, Session Manager)
- Detailed CPU utilization tracking during boot, per every CPU core
- I/O activity tracking during boot
- System Interrupt / Context Switch tracking during boot
- Text Log generation and Printing
- History Feature, for comparing current with the past boot results

WinBootInfo is not free but it is compatible with Windows XP as well as Windows Vista and Windows Server 2008. It costs $14.95 but a 30 day trial is available.


Boot Log XP:

Boot Log XP is the best Windows boot analyzer. It has got all the features of the previous analyzers plus it is compatible with Windows 7 also. Boot Log XP creates a new boot log file and then displays the log file visually so that we can better understand what’s going on with our system. This software is also not free. It costs about $19.95 for a single license but it is available for a 30 day trial.

Download Boot Log XP

Hey! My friends, If you like my post you can save it using "Save Page as PDF" button below and you can even share them to your friends with social networking buttons provided below this post.

Add To Google BookmarksStumble ThisFav This With TechnoratiAdd To Del.icio.usDigg ThisAdd To RedditTwit ThisAdd To FacebookAdd To Yahoo

Sunday, May 23, 2010

PDF Password Remover Tool : A Tool To Remove Editing Restrictions From A PDF File


There could be a scenario when you get a protect pdf files which you can open but cant edit in pdf editing tools, you can’t even select text, order a print or change the pdf properties like form fields. In such cases you can use the free tool called PDF Password Remover.

PDF Password Remover Tool is a PDF decryption tool developed by PDF Technologies that can be used to decrypt password protected PDF files

Free PDF Password Remover Tool can remove owner password from PDF files. PDF files with the owner password set would prevent viewers from editing, selecting text, printing and otherwise changing any of the pdf properties such as form fields etc.

This PDF Password Remover tool will decrypt and remove owner passwords from any PDF document.


This tool will not work with the pdf files which have user password defined, irrespective of whether you know or don’t know the password if the pdf does not belong to you then you cannot remove the password.

Please use this tool to remove passwords from PDF files that belong to you. It was developed to help you recover PDF files in cases where you forget the owner passwords you once set and can no longer remember. It can be life-saving when you misplace your originals. Yes this wonderful pdf password remover tool is absolutely free for personal use.

Just open the password protected PDF file and click on Convert button to remove the PDF password. However, The Password Remover tool will NOT work with PDF files that have a user password set.


Hey! My friends, If you like my post you can save it using "Save Page as PDF" button below and you can even share them to your friends with social networking buttons provided below this post.

Add To Google BookmarksStumble ThisFav This With TechnoratiAdd To Del.icio.usDigg ThisAdd To RedditTwit ThisAdd To FacebookAdd To Yahoo

Saturday, May 22, 2010

How To Fix Taskbar Disappearing Problem In Windows ?


Many Windows users some times report the problem of taskbar disappearing, or going invisible in windows while they are working. As said by some of the Windows 7 users this happens when they press window key + d which is show desktop shortcut in windows and for some it happens suddenly.

However when taskbar is not visible, still you can access and switch among all the opened programs by pressing ALT+TAB key. But if the problem is happening only with the taskbar, then you can follow the methods below to solve the problem.

Method 1
If you suddenly pressed show desktop or window + d to show the desktop icons and taskbar disappeared then try pressing the same shortcut again, taskbar will become visible again.

Method 2
If the taskbar is not appearing after applying the Method 1, then it means that you will need to restart the explorer in order to fix this problem. Here is how you do it as explained below:

1. Press Ctrl+Shift+Esc to open task manager
2. Click File menu and select “New Tasks (run…)”
3. Type “explorer.exe” and click ok or Enter on the keyboard

Windows explorer will now restart and taskbar will appear properly, once the windows explorer is restarted.

Still if your problem is not solved, then make sure that you don’t have the settings enabled in windows which says auto hide the taskbar to save space on desktop. Just check the taskbar properties for the same, right click on the start button and then select properties and then click the taskbar tab, you will see the option as shown in the image below:


Hope you find this tutorial easy to follow.

Hey! My friends, If you like my post you can save it using "Save Page as PDF" button below and you can even share them to your friends with social networking buttons provided below this post.

Add To Google BookmarksStumble ThisFav This With TechnoratiAdd To Del.icio.usDigg ThisAdd To RedditTwit ThisAdd To FacebookAdd To Yahoo

Friday, May 21, 2010

How To Block Virus Transfer From USB Flash Drive ?


Flash drives present a significant security challenge for large organizations. Their small size and ease to use allows unsupervised visitors or employees to store and smuggle out confidential data with little chance of detection. Both corporate and public computers are vulnerable to attackers connecting a flash drive to a free USB port and using malicious software such as Keyboard loggers or packet sniffers.

USB flash drives may also be used deliberately or unwittingly to transfer malware and autorun worms into a network of personal computer. In order to block virus spreading or copying on your computer, you can also use the free to use tool called Smart USB Flash Drive Blocker – This software easily blocks the USB drives from copying any automated virus files on your computer. With Smart USB Flash Drive blocker you can easily block / unblock USB Flash drives.

In simple words application allows you to copy data from virus infected drive and block all the virus files to be copied from USB drive. It is very easy to use, and you just need to run the portable application and it will block the USB drive.

Once you have clicked the block button, it will show a message prompt that the USB drives are now blocked.

I hope this utility prove to be helpful for you, or you may try some other virus blocking programs like Smart Virus Remover, USBProtect and Autorun Killer.


Hey! My friends, If you like my post you can save it using "Save Page as PDF" button below and you can even share them to your friends with social networking buttons provided below this post.

Add To Google BookmarksStumble ThisFav This With TechnoratiAdd To Del.icio.usDigg ThisAdd To RedditTwit ThisAdd To FacebookAdd To Yahoo

Wednesday, May 19, 2010

How To Install Windows XP Using Bootable USB Drive?


Is your genuine Windows CD over-scratched or your CD-Rom take too much time for reading the disk? Here is the finest way to eliminate the use of Genuine Windows XP CD again and again by replacing the same with the USB dongle which can me made bootable and put into use for the installation of the Windows XP on your system.

Requirements:
1. Windows XP ISO [Pro/Home with any Service Pack].
2. WintoFlash [Freeware tool].
3. A USB Flash Drive [At least 1GB].
4. Magic ISO [Install this in your PC].

Steps To Follow:

A. Preparing Windows Files:
1. Open your Windows XP ISO with Magic ISO.

2. Extract all windows files to a new folder.

3. After Extraction


B. Preparing you Flash Drive:


C. Preparing Bootable USB:
1. Download wintoflash and Open the Main GUI.

2. Select Windows XP in the List.

3. Select your USB patch and Extracted Folder Patch.
4. Now Press Run and agree the License and agreement.

5. It will format your Flash drive Again.

6. The Tool will Copy the Files to Flash.

7. Finished.

D. Boot from USB:
1. Now restart your PC and enter your BIOS setting at Start-up.
2. Change Boot preference to USB drive [make sure you have already plugged your USB].
3. Then Restart[Save Changes in BIOS before Restart].
4. Now you will be able to Boot from your USB Drive.


Install the windows XP as you install it from your Genuine Windows XP CD without much letting your CD-Rom bear the load and wear down your CD.

Hey! My friends, If you like my post you can save it using "Save Page as PDF" button below and you can even share them to your friends with social networking buttons provided below this post.

Add To Google BookmarksStumble ThisFav This With TechnoratiAdd To Del.icio.usDigg ThisAdd To RedditTwit ThisAdd To FacebookAdd To Yahoo